
Chenille Scarf by Ruth Chandler
 This technique uses a special rotary cutter that has a guide on the bottom of the blade to prevent all layers of fabric from being cut. There are two ways to accomplish the fraying that makes the chenille. First, you can cut the fabric at a 45 degree angle, second you can stitch the fabric at a 45 degree angle. Without this angle the fabric will not fray nicely and you will be disappointed with your results.
Supplies:
- 2 yards fabric, I used cotton and rayon (one other tip, do not use a loose weave fabric)
- Havel’s chenille rotary cutter
- Havel’s straight rotary cutter
- 24 inch ruler
- Cutting mat
- Marking pencil
- Sewing machine
- Thread to match fabric (the thread can also be a contrasting to add a design element)
- Pins
There are two different options to choose from
when making your chenille scarf…
Option #1 – Fabric cut at 45 degree angle:

Stitch lines 1/2″ apart, from end to end.
- First, press your fabric. I like to use a light starch spray such as Best Press. It will allow you to get a more controlled cut.
- Lay the fabric out on a large table with the cutting mat under the fabric.
- Using your ruler, find the 45 degree angle.
- Line it up on a selvage edge of the fabric and draw a line along the ruler on the fabric. You will have to move your ruler keeping it lined up with the marking line until the line reaches across to the other selvage.
- Now is the time to decide how wide you want your scarf, I would suggest no narrower than 6 inches and no wider than 12 inches.
- Use at least 4 layers of fabric but no more than 6… I used 5. More than six layers and the scarf will be too bulky and the cutter will have a difficult time cutting through all the layers. Not to mention the wear and tear on your hands!
- Now for the layering – the bottom (or first) layer needs to be right side DOWN.
- Place the other layers right side UP on the first (or bottom) layer.
- Pin the layers together, matching up the edges and smoothing out any wrinkles. Take your time with this step and use lots of pins, especially with the rayon.
- If the edges are a little off that is okay, we will trim it up at the end.
Now it is time to stitch. Stitch from one end to the other, length wise. I used the markings on my machine throat plate to guide the stitch lines, but if you are not comfortable with that you can mark lines with your marking pencil. Try to keep the markings as faint as possible so they are easier to wash out. The chenille cutter has instructions on the package, it is important to read these so you can choose the right blade guide for your scarf. My stitch lines were a ½ inch apart so I used the medium 6mm guide. This worked well on the 5 layers of rayon that I cut at the 45 degree angle.
 Start at the right edge and stitch lines ½ inch apart end to end, until you have filled the whole scarf.
- Make sure to backstitch at the beginning and end of each row to hold the stitching.
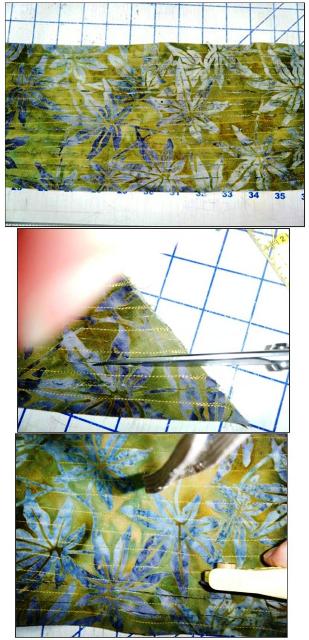
- Lay the scarf out on the cutting mat.
- Prior to this next step, engage your chenille blade in preparation for cutting.
- You may want to snip the ends of your rows first with scissors, to get started.
- Now, slide the cutter guide into the first row of stitching under all layers EXCEPT the bottom layer – do NOT cut the bottom layer of fabric!
- Slide the cutter along the row and repeat this process till all rows are cut.
- Be sure the guide is flat on the table, it will work more smoothly.
- Sometimes a few fibers from the fabric will catch on the guide, simply pull the fibers out using a pair of tweezers.
- If you want a little fringe at the ends of the scarf, you can cut through all layers to separate them. I would suggest not cutting the fringe any longer than 4 inches.

Here is a close-up of the chenille scarf
after it’s been washed.
Now comes the magic part! Throw the scarf in the washer. I suggest a few towels also. Wash on a regular cycle. When you pull it out it will be frayed! Dry it with the towels, (you may have to shake your towels outside to get rid of stray threads) and when it is dry you will have a beautiful scarf! If the edges need to be trimmed to make it less ragged on the edges, use your straight rotary cutter to trim the outside edges.
Option #2 – Fabric stitched at 45 degree angle:
- This technique takes a lot more time and thread.
- Press and starch the fabric.
- Lay the fabric out and cut 5, 8″ wide strips the length of the fabric.
- You should have 5, 8″ x 72″ strips.
- Lay the first strip right side DOWN.
- Layer the next 4 strips right side UP.
- Pin all layers together.
- Find the 45 degree angle on your ruler and mark across the scarf starting at one narrow end and working down to the other.
- Stitch along the markings, be sure to backstitch at the beginning and the end of each row.
- Stitch all rows.
-
Prior to this next step, engage your chenille blade in preparation for cutting.
- You may want to snip the ends of your rows first with scissors, to get started.
- Now, slide the cutter guide into the first row of stitching under all layers EXCEPT the bottom layer – do NOT cut the bottom layer of fabric!
- Slide the cutter along the row and repeat this process till all rows are cut.
- If the guide is flat on the table it will work more smoothly.
- Follow the above directions for washing and drying.
I hope you enjoy making a scarf to match your personal style. As always, I love it when you send me photos of your finished work.
Ruth
")
")
")
")
")
")
")
")
")
")
")
")
")
")
")
")