5 Tips For Attractive Borders For Your Quillts
By Holly Hanover
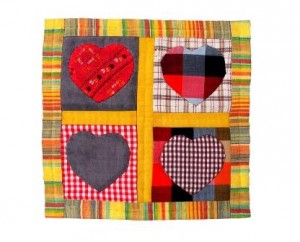
You’ve put a lot of time and effort into making your beautiful quilt, and you’re almost done. Just like the proverbial icing on the cake, one of the finishing touches remaining is to add attractive borders. If this is one of your first few quilts, you may be unsure of how to proceed. Here are a few tips to ensure that your quilt has attractive borders and your work is a success.
-
Border design: Simple doesn’t have to mean boring, just as complicated doesn’t necessarily mean attractive, so start by picking a simple border design. This can be done by adding one strip to each side of your quilt, or double your pleasure by adding two. Once you have this under your belt, you can try more complex or detailed and attractive quilt borders such as squares, rectangles, triangles, or nine-patch.Color me happy: You can make your quilt border fun and interesting based on the colors that you choose for each strip. Solid strips serve as a pleasing contrast to a patterned base, or you can choose one or more strip colors that appear in the base.Border type: While there are many types of borders, butted borders (borders that are sewn straight) are quick and easy, and therefore great for beginners. For those who already have completed butted corners, you can try adding corner squares in your butted borders.Measure twice, cut once: One thing can create an unattractive borders are those that were not measured properly. Always round to the nearest inch and add ¼ inch allowance to all seams. Use the center of your quilt for measuring borders as it tends to have the least fluctuation in length or width. and don’t forget to double check your measurements before cutting – after all, a stitch in time saves nine!Practice: If you are unsure whether you have the hang of adding quilt borders, why not practice first? Do a trial run not only of measuring a border but also adding it to a small piece of fabric. By learning where your problems areas are and learning how to fix them before working on your quilt, you can guarantee that your quilt will look stunning without the stress of redoing mistakes.
With these few tips in place, you can start to measure and sew your own attractive quilt borders for your quilt. Have fun!
Posted in How to Quilt, Quilting, Quilting & Embroidery Tagged art quilting, how to quilt, Quilting Comments Off on Quilt BordersFused Appliqué Techniques
by Terry White
Appliqué is a sewing technique by which you apply one piece of fabric to another. Over the years there have been many different types of appliqué techniques developed by ingenious stitchers. For this project, I am going to use fusible web and machine stitching.
I decided to add a blue cat and oranges to this patchwork quilt. Here is a photo of the quilt in progress. The “Blue Cat” or in some instances “Jazz Cat” is one of my recurring design motifs. With the addition of the dark blue cat, I found that deeply colored oranges set off the design and the color of this quilt. The bright green leaves also add an interest of color to the design.
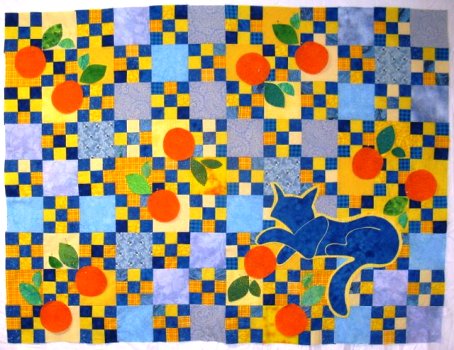 Notice the positioning of each appliqué element. The oranges are offset on yellow blocks. The green leaves are positioned on adjoining yellow blocks. The blue cat is layered over a piece of yellow fabric so that he remains a separate design element. In other words, the design lines of the cat remain separate and don’t melt into the surrounding blue squares.
A Little Story:
When I was little Girl Scout, (growing up in California) our troop went to a Mexican street fair. I bought a blue flocked plaster cat bank. My name was applied with glitter on the back. I thought that it was the most beautiful thing in the world. We also had an orange tree in our backyard. These are the sources for my imagery in this quilt.
Fused Appliqué
A very easy way to do machine appliqué is to use a product known as “fusible web”. There are different types of fusible web and they have different purposes. You can find this at any fabric store, just ask the sales people.
For this project, I am using a paper backed fusible web. It is very important when using this product to test it with your iron and fabric. Understand how hot your iron should be and how long the iron should be applied to the paper and fabric.
For this quilt, I’ll show three different techniques for using the fusible web. One method (the most straight forward) I will use with the leaves.
The paper on the back of the web is like tracing paper. You can see designs through it to trace with a pencil.
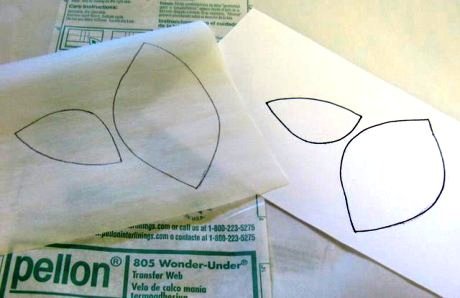
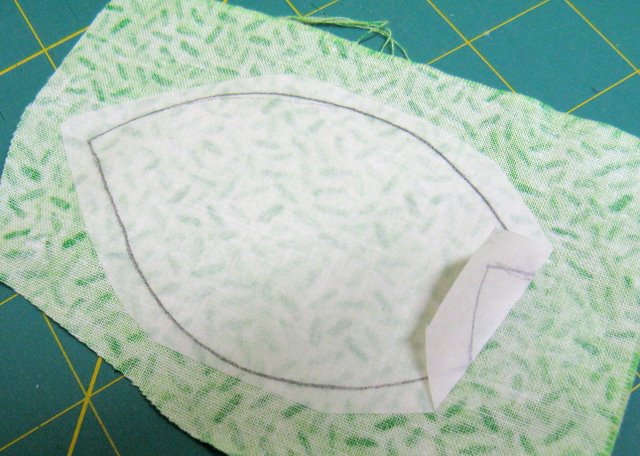
Trace the leaf shapes onto the paper side of the fusible web. Draw as many sets as you need. I have 12 oranges, so I traced 12 sets of leaves.Rough cut around the leaf shapes. Iron green fabric to the glue side. I used scraps of different green fabrics. This is a scrap quilt, after all. The various green fabrics create a more lively design.
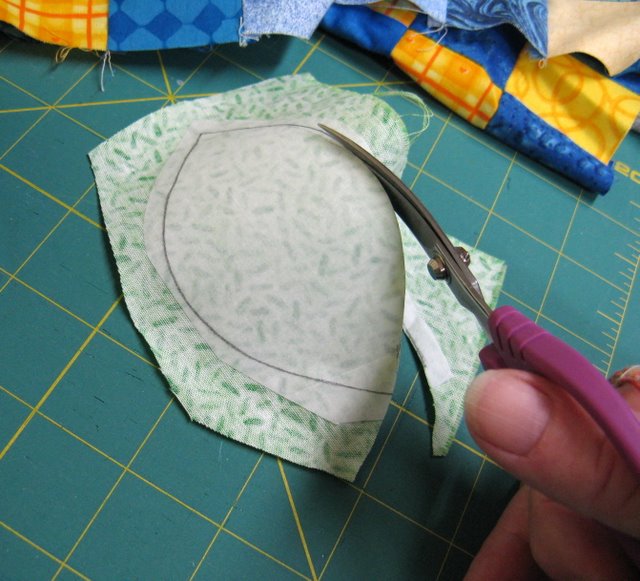
Pull a little bit of the paper backing off before cutting out the leaf shape. I call this the pre-pull. It makes it easier to pull the paper backing off once the leaf shape is cut out.
Cut out the leaf shapes.
I like to use Havel’s curved scissors for this.
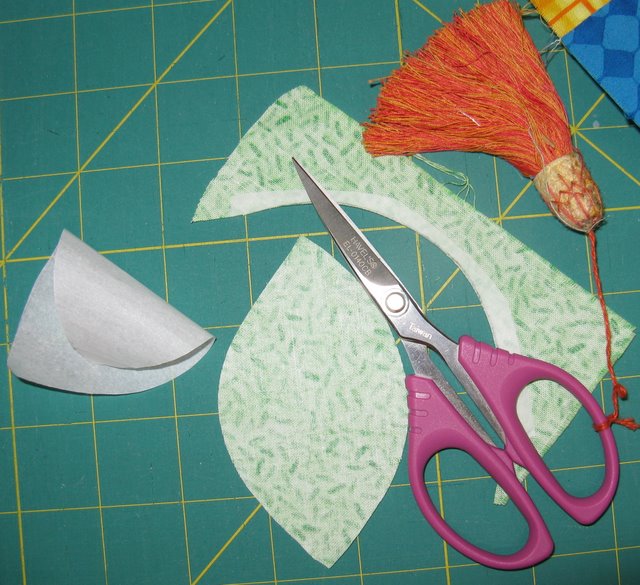
You get a really nice curve to the shape when you cut.Pull the paper backing off.
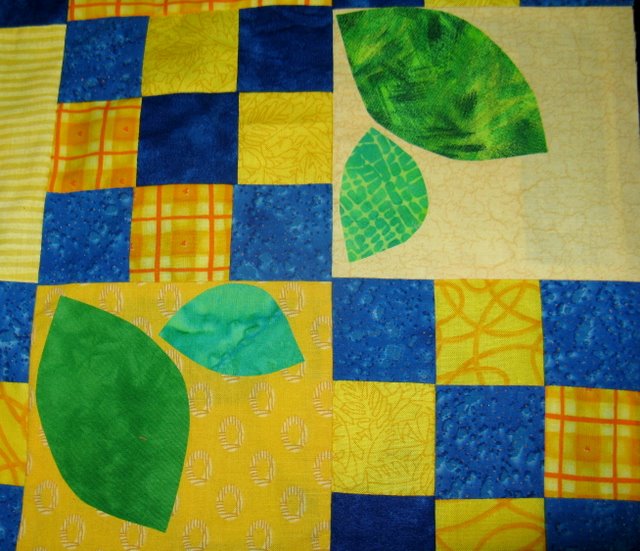
Place the leaves on the yellow squares on the quilt. Fuse the shapes according to manufacturer’s directions. The leaf shapes are ready to stitch to the quilt by machine.
 Terry White is a studio fiber artist. She has been doing this work since 1996, and she discovered the techniques she uses: threadpaint, machine appliqué, piece, quilt, embellish with beads, fibers and minutiae with sewing machine techniques, through experimentation and self-study. Terry teaches these techniques through classes and videos. Over the years Terry has been published in over 50 articles in magazines and books, including: McCall’s Needlework; Quilter’s Newsletter; Machine Embroidery and Textile Arts; CMA trade magazine; Stitch n Sew Quilts; Quick n Easy Quilts; Quilt World magazine and Calendar; Quilting Arts Calendar 2003; America from the Heart; America’s Best; America Sews. She is a wife, stitcher, artist, sister, mother, friend, nana, gardener, baker, writer, student, teacher and American. See more of Terry’s work at www.threadpaint.com.
Posted in Applique, Fused Applique, Guest Writers, How To, Terry White Tagged applique, fused applique, Terry White Comments Off on Fused Appliqué TechniquesJamie Fingal Interview
Interview with Mixed Media Artist Jamie Fingal
By Jackie Marsal
Jamie Fingal is a teacher, curator and last, but certainly not least, an artist. Her work is rich with vibrant colors, and her unique style is imaginative and inspiring. I spoke with Jamie recently about her thoughts on art, the industry and starting out in mixed media.
How long have you been a mixed media artist?
I’ve been doing this since about 2002, when I took the leap into making art quilts with my own designs.
How would you describe your style?
Funky, eclectic, whimsical, edgy, abstract, vibrant, magical, and definitely fun!
Was there a certain artist that inspired you in the early stages of your career?
Yes, that would be Yvonne Porcella, hands down. She creates magical quilts with vibrant colors, and I love the black and white checks she uses in some of her work.
Apart from creating art, what else do you do within the industry?
I also curate art quilt exhibits with Leslie Tucker Jenison under the name “Dinner at Eight Artists.” You can find more information on that at http://dinnerateightartists.blogspot.com. Leslie and I also teach together too.
What is the most challenging part about creating mixed media art?
I would say the most challenging part is trying to keep my work fresh without being trendy. I always try to be true to myself, which is the most important thing of all.
What’s the best advice you could give someone who wants to try quilting or textile art for the first time?
Just go out there and do it! You can start by making a smaller piece, like 8×10 inches, and put one object it in – a chair, a flower or something that inspires you. Do a series of these little exercises and then go larger with more objects, and you’ll be off and running! Try to make it more about having fun than about perfection.
See what scissors the Mixed Media Artists are using.
About the Author:
Jackie Marsal has been with Havel’s for seven years
and is the Account Executive for Havel’s Sewing.Posted in Guest Writers, Interviews, Jamie Fingal, Mixed Media Tagged Fabric Art, guest writers, Jamie Fingal 1 CommentAppliqué
8 Tips for Reverse Applique
By Holly Hanover
Reverse applique is not nearly as complex as it sounds. It is essentially the same as direct applique except that two or more pieces of fabric are layered. The top layer(s) of fabric are cut away to reveal the hidden fabric and create lovely and impressive results. It is a great and simple way to add visual interest and compelling texture to your quilting and craft projects.
What follows are some simple tips to ensure professional looking results in your reverse applique endeavors:
- Wash and starch all your fabric pieces (for this article we will assume you are using two). This helps them to lie flat, makes them easier to work with, and ensures a clean presentation when complete.
- Freezer paper makes a great stabilizer. To give your motif a crisp, clean edge, freezer paper works wonders. Just remember to pull the paper out before you completely stitch your applique in place. Also: when drawing directional designs (like lettering), make sure to transfer them backwards so they are facing the right way when finished.
- Make the markings on the WRONG side of the TOP layer of fabric when transferring your pattern. The markings you make here will be the seam line that you sew upon with your machine. However, by marking them on the wrong side you will actually be able to see them as you fold them under and iron!
- Fold the fabric when cutting away the insides of the design. This is the best way for cutting out your reverse applique pattern where the bottom layer of fabric will show through. For better control, use embroidery scissors.
- Clip all curves and corners in the seam allowance. This is essential to get your design to lie flat. Then, fold in your seam allowance while CAREFULLY ironing it flat.
- Cut the BOTTOM layer of fabric without a seam allowance. Do this so that when you place the top layer on, the raw edges of the bottom are flush with the folded seam allowance of the top. Layer them both right side facing when pinning in place.
- Water-soluble thread can be used as an alternative to blind stitching your layers together. This thread will wash out so you don’t have to worry about making it “perfect”.
- Keep a toothpick handy to tuck back in any naughty edges that might pop up as you machine stitch your reverse applique in place.
CLICK HERE FOR THE BEST SCISSORS FOR APPLIQUE
Interview with Mixed Media Artist Leslie Tucker Jenison
Leslie Tucker Jenison on Mixed Media Art
By Jackie Marsal
I recently sat down with Leslie to talk about her work in the industry as a mixed media artist.
How long have you been a mixed media artist?
I’ve been making quilts for over 30 years, but I’ve been dabbling in mixed media for about 10 years, and more intensively in the last 3 to 5. I love combining cloth and paper. A lot of unconventional objects and materials frequently find their way into my work.
How would you describe your style?
This has always been a difficult question for me because I do both abstract and representational work. I probably lean more towards abstraction because I believe it invites the viewer in to create a unique dialogue with the artwork.
Apart from creating art, what else do you do within the industry?
Aside from consuming loads of products? (Laughter) Well, I also love to teach and curate exhibitions. With my friend and teaching partner Jamie Fingal, I’ve taught nationwide at a variety of different venues. I also curate an annual exhibition that debuts each year at the International Quilt Festival in Long Beach, as one half of “Dinner at Eight Artists.”
What is the most challenging part about creating mixed media art?
Mixed media, like any other medium, has a wide variety of materials and techniques that can be incorporated into the process. Part of the fun and challenge is to develop a comfort level with these things. Like any other form of art, the most important thing is to “do the work.” Just get in there and make a lot of mistakes, and take a path with no particular destination. This is when the best “aha” moments happen for me.
What’s the best advice you could give someone who wants to try quilting or textile art for the first time?
I would try to find a fun group or class that appeals to you (you might have to shop around a little bit). Look at all the yummy “how to” books, visit a few quilt shops and find a comfortable place to dive in and swim. Plenty of people do this on their own, but for most people I think there’s something wonderful about finding a group environment to share and learn from. Don’t be afraid to make mistakes because you will probably learn more from those than anything else you do. Just start making stuff and have some fun! Surround yourself with people who support you and lift you up. Life is way too short for anything else.
Click here to see what scissors the Mixed Media Artists are using
About the Author:
Jackie Marsal has been with Havel’s for seven years and is the Account Executive for Havel’s Sewing.
Posted in Interviews, Mixed Media Tagged Leslie Tucker Jenison, Mixed Media, Mixed Media Artist Comments Off on Interview with Mixed Media Artist Leslie Tucker Jenison

