5 Common Mistakes of Beginning Quilters

By Holly Hanover

No matter what type of sewing you’re in the mood to undertake, (quilting, dressmaking, mending, etc) there is one resounding truth that encompasses each and every element of the craft: mistakes will be made. Even the most experienced quilter will mess up from time-to-time, and when it comes to quilting for beginners, mistakes inevitably become a huge part of the sewing process.

Fortunately, we quilters are a friendly, communal bunch and are more than happy to pass on our empirical knowledge so that you don’t spend the majority of your quilting time ripping out seams in a state of frustration. Here are five common mistakes common of beginning quilters that you can learn to avoid:

  1. Attempting a Complex Pattern: It’s easy to go difficult. Complex, intricate patterns are the reason many of us fell in love with quilting in the first place, and a common mistake is to attempt such patterns from the get go. In quilting for beginners, the solution is to go with simple, straightforward square patterns. You’ll learn so much undertaking these easy patterns and have much more fun learning from them than you would a complex pattern.
  2. Uneven Seams:  If you’re sewing the type of quilt that involves piecing together many blocks of fabric, uneven seams will destroy all of your hard work. Keep your eye not just on the needle, but on the raw edges of your fabric as you sew. Most machines have a guide that will show you where you need to line up the raw edges to achieve a ¼’’ seam allowance. If you’re using an older machine that doesn’t have this feature, a piece of masking tape placed in just the right spot will to the trick.
  3. Poor Fabric Cutting:  When quilting, it’s important to cut all your shapes uniformly and neatly. Many instructions for quilting for beginners don’t include a guide in how to operate a rotary cutter. This tool can save you a lot of time and grief when used properly, and with the right accessories, like a transparent ruler. Check out this instructional video for more tips.
  4. Forgetting to Backstitch:  In sewing, backstitching is essential. Backstitching reinforces a seam by reversing the stitch direction at the beginning and end of each seam. It is key to holding your quilt pieces together. When omitted, your pieces will fall apart, so remember to backstitch.
  5. Poorly Pressing Seams and stretching fabric:  Many beginning quilters and sewers fail to understand that properly pressing your seams, while time consuming, is an essential part of the process. In order to get your fabric to lie flat and achieve a clean, pleasing result, take the time to thoroughly press all your seams. For quilting, you should lay your fabric on your ironing board with the wrong side facing you. Then, iron your seams in the same direction. Keep in mind that moving the iron back and forth will likely cause your fabric to stretch, so take the verb “press” literally.

Remember these five mistakes, and their solutions, and you will have much more fun on your many quilting projects. However, always keep your seam ripper handy, because even years from now, when you’re a quilting master, mistakes will still happen!

 Click Here for more Beginning Quilters Tips 


Posted in Fabric Rotary Cutters, For Beginners in Sewing, How to Quilt, Tutorials, Uncategorized | Tagged | 2 Comments

The Scrap Quilt

A Nine-Patch Variation

By Terry White
 

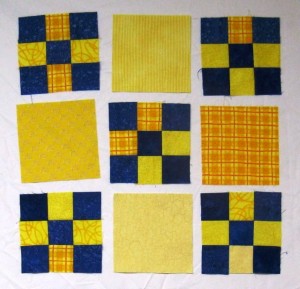
Using the same easy nine-patch block, you can make an entirely different quilt. In this quilt, there are no lattice strips, so the blocks make an allover design. I used blue and yellow. Instead of using just one yellow, I pulled as many light yellows as I could from my stash of fabrics…and the same with the blue.
 
Using blue and yellow is an easy choice for this type of scrap quilt because the two colors contrast so nicely. I can use a range of blues from lights to darks, and also different hues of blue. Bright blues and turquoise, grey blue, all work. The yellows range from lemon yellow to orange and I still have my strong color distinction.
 
I used fabrics leftover from other projects, so this a true scrap quilt. I believe that this mix makes a lively quilt…and, did I mention that these really are all scraps…so this quilt top cost me $0…yay!
 
quilters-stash-of-fabricAs a quilter, I have what is known to quilters as a “Stash” of fabrics. This is the fabric that I have color coordinated in bookshelves…this is the fabric I buy when I see it, like it and can afford it. Having this ‘stash’ makes it easy to start a new project at any time. I said start, not necessarily finish!


blue-yellow-scrap-strips
 
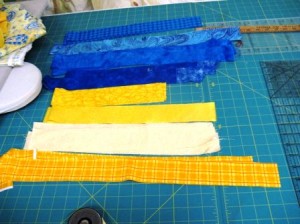
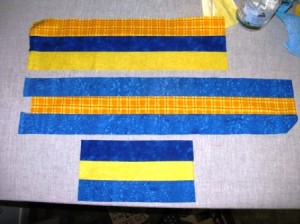
Here are strip sets just like the ones in the first quilt. The difference is that the width of each strip is cut 2 inches wide. So, each square finishes at 1 1/2 inch square. So, that means that each nine-patch block will finish in the quilt at 4 1/2 inch square.


yellow-squares-cut-5-inches
 
Next, I cut yellow squares the same size as the nine-patches (this is a 5 inch square which will finish as a 4 1/2 inch block). I am making a larger nine-patch with the small nine-patches and solid fabric squares.


9-patch-with-blue-fabric


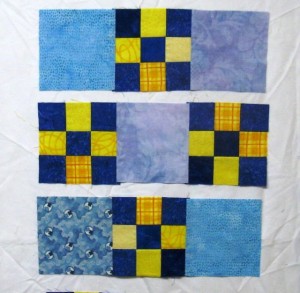
The next nine-patch is stitched with blue squares of fabric. As you can see, I used deep blues in each strip set. Then, I used medium to light blues for the 5 inch fabric squares.


blue-and-yellow-squares-alternated
 
 
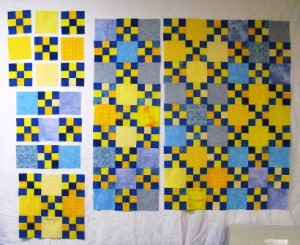
Here you can see the whole sequence of assembly. The blue and yellow solid fabric squares are alternated. So, you have a nine-patch in a nine-patch in a nine-patch.


dark-blue-squares-create-irish-chain
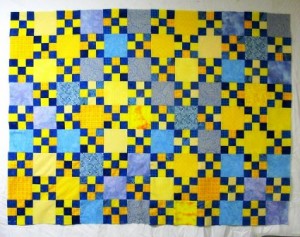
Here is the final assembly of the quilt top. The dark blue squares create an allover design known as “Irish Chain”. The quilt top is 54 inches wide x 40 1/2 inches long. This is a great size for a child or lap quilt.


I like the strong graphics and mix of colors in this quilt. It has an optical illusion of the little squares floating over the background.

Making nine-patch blocks are a very good way to learn to piece and get good practice for matching seams. The more you do, the more you can do.

This quilt is made in my sister’s colors…but it is not ready to quilt, yet…I have further designs for this quilt.

If you’re just starting with quilting and Nine-Patch, click here for the previous instructional blog. And for the best quilting scissors
and rotary cutters, click here.

Posted in For Beginners in Sewing, Guest Writers, How To, Make a Nine-Patch, Terry White, Tutorials, Uncategorized | Tagged , , , | Comments Off on The Scrap Quilt

How to Make Appliqués

Double-fused Appliqué and Machine Stitching

By Terry White

The Oranges

Here is a fused appliqué technique that works when fusing over seams.

The oranges are going to be placed across the patchwork seams. If you just fuse the orange shape to the quilt, then you will see and feel the patchwork seams come through the orange. To prevent this, you can fuse the orange shape to a white fabric and then, stitch to the quilt top.

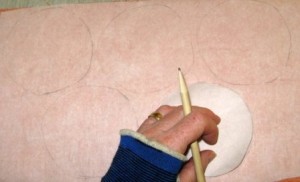
Trace the orange shape onto the paper back of the fusible web. I like the oranges to be not perfectly round. By tracing the shape, I can make each orange a little different.

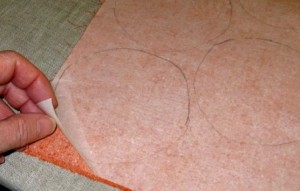
Fuse the wrong side of the orange fabric to the fusible web. At this point, peel back a little of the paper backing before cutting out the orange. It will make it easier to pull the paper when the whole orange has been cut out.

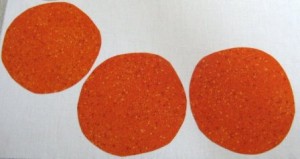
Cut out the oranges and fuse them to white cotton fabric.

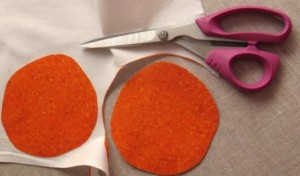
Cut the oranges out of the white fabric. The orange shapes will have more body and the color of the patchwork and seams won’t show through.

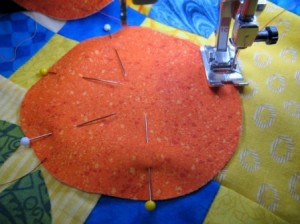
Pin the oranges in place on the quilt and they are ready for stitching. I use about five big quilt pins. Take each pin out before you get to it while you are stitching. Keep the patchwork and the orange very flat while you stitch. Notice the position of the presser foot. I use the presser foot as a guide as I stitch.

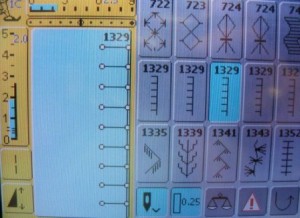
This is the stitch I’m used for appliqué. Notice that I positioned the stitch all the way to the right. This is so that the appliqué is moved by the feed teeth.

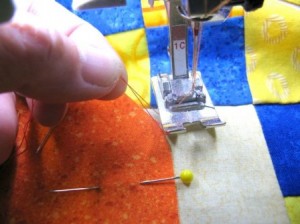
The first thing is to bring the bobbin thread to the top of your work. This allows for a great first stitch. Bring the bobbin thread to the top by inserting the needle into the work once and then pulling the thread up, holding the top and bobbin thread in your hand before taking the first stitch.

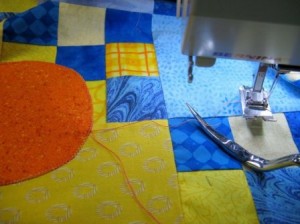
After stitching, cut the top and the bobbin threads about two inches from the last stitch. Pull the all threads to the back of the work with a hand needle. Secure them on the back with a knot.

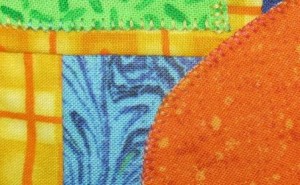
Here is a close-up of the stitching. I used variegated green and orange threads (Star Cottons) for the stitching.

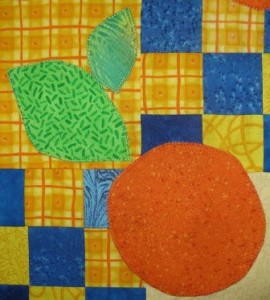
Here are the oranges and leaves on the blue and yellow quilt.

Click Here for More Projects by Terry White

Posted in Applique, Free Craft Projects, Fun Stuff, Fused Applique, How To, Terry White, Uncategorized | Tagged , , , , , | Comments Off on How to Make Appliqués

PINKING SHEARS OR PINKING ROTARY BLADE?

Quilting tips for your “Pinking” needs.

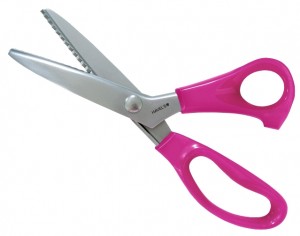
durashears-pinking-9-inch-#2

Havel’s Sewing Pinking Shears

By Holly Hanover

In the world of quilting, finishing your seam allowances with “pinks” is a must in order to prevent fraying, enabling your hard work to last, and generally just make your life easier.

Most of us are familiar with pinking shears. They’re the saw-toothed “zigzagged” scissors that every crafty and inspirational matriarch in your life undoubtedly had. Perhaps, as a child, you were fascinated by your mother or grandmother’s pinking shears just like the rest of us. You couldn’t wait for the time when you too, knew how to use such a fascinating tool.

While the existence of pinking shears has transcended three centuries, rotary cutters, especially the pinking rotary blade, is relatively new. Many sewers and quilters are still surprised to learn that such a thing as pinking rotary blades exist! If you’re one of them then you are no doubt curious as to how they work, how they’re different than pinking shears, and what, exactly, they have to offer.

First, let’s compare some of the traits of each:

Pinking Rotary Cutter:

  • For trimming it is sharp, quick, and precise.
  • Easily cuts through multiple layers of fabric as well as thicker fabrics such a vinyl or leather.
  • Makes a handy paper cutter (although, using them for paper crafting will dull the blade, so if you’re looking to do both invest in a blade for paper and a blade for fabric).
  • Easy on the hands. A rotary cutter is great for those with arthritic joints.

Pinking Shears:

  • A bit more convenient as they don’t necessarily require a cutting mat
  • Can give you better control over trimming smaller pieces that you might need to hold in your hands as you cut.
  • By investing in a quality pair, you can achieve comfort as you cut.
  • Much less danger of nipping your finger tips than there is with a rotary cutter. For this reason they are ideal for young crafters.

How to pink!

While the results of both tools are essentially the same, implementing them is very different. Here is a brief description on how to use either pinking tool:

  • Pinking shears: the technique is pretty straightforward. Just as you would with normal shears, you use one hand to hold the fabric down in place and cut with the other, keeping the longer blade against your cutting table.
  • Pinking Rotary Blade: it is not as simple as attaching the blade and cutting up your fabric as if it were a pizza. Firstly, a cutting mat is essential or else you will destroy your tabletop! A clear ruler is also needed to ensure a straight edge. It is also very important that you hold the cutter just so to prevent the pinked blade from missing a beat. Hold your rotary cutter straight up, with the handle pointing toward the ceiling as you cut to achieve the best results. For a demonstration of this, take a look at this instructional how to video.

If you still can’t decide which pinking method is best for you, then simply go with the one you’re most comfortable with. Whether pinking shears or a pinking rotary blade, you’ll get great results through practice and investing in quality blades.

Click here to see Havel’s Pinking Tools

Posted in Fabric Rotary Cutters, Uncategorized | Tagged , , , , | 4 Comments

LIZ KETTLE

Interview with Mixed Media Artist Liz Kettle

By Jackie Marsal

What can we say about Liz? Well, for starters, she’s absolutely wonderful! I’ve had the pleasure of working with her in the last year, and there’s never been a dull moment with her! She has an exuberant and colorful personality that matches her art to perfection. I recently spoke with Liz about her career as a mixed media artist and found out, among other things, what inspires her most in her work.

How long have you been a mixed media artist?
I’ve been mixing up my media for a long time now. I could never just commit to one type of medium, even when I was a kid. I started combining and mixing different media with more of a focus about 8 years ago.

How would you describe your style?
Eclectic! My work is generally divided into two styles: abstract and narrative. However, I love so many different styles that I guess you could say I’m a mixed style artist as well as mixed media.

Was there a certain artist that inspired you in the early stages of your career?
There are just too many inspiring artists to count! If I had to narrow it down to just one, I would say Jan Beaney and Jean Littlejohn. Well, actually that’s two, but they’re a team so I’m counting them as one! Their innovative stitch and mixed media work captures the essence of “what if.”

Apart from creating art, what else do you do within the industry?
I also love to teach! Classes and workshops are so much fun, and I get so jazzed when a student gets really excited about creating art that is personal and unique to them. I also write books and articles for magazines and blogs, and host free online book studies on my web site.

What’s the most challenging part about creating mixed media art?
Confidence, without a doubt. When you’re out there creating something personal and authentic, you’re working without a pattern or template or any kind of rules. It can be really hard to trust yourself with your skills and instincts, but once you do, you’ll be amazed at what you discover.

What’s the best advice you could give someone who wants to try quilting or textile art for the first time?
First, get the right tools for the job and don’t skimp. Getting by with inferior tools has cost me time, money and a lot frustration. Second, be brave! There’s no “perfect” in art. Follow your heart and make what you love. Last one – is it ok that I didn’t stop at one thing? Ok, last one … PLAY! We get so focused on producing stuff that we forget to play sometimes. That’s the fuel for creativity. Playing means you’re just mess around with your supplies and tools with no set goal in mind. Have fun and lose yourself in the flow, and great things will come as a result!

Go to Textile Evolution to read more about Liz Kettle

Posted in Liz Kettle, Mixed Media | Tagged , , , | 5 Comments