Mixed Media Quilt Project: Scrappy Spider Web

By Terry White

Using bits of tissue paper, packaging, wrapping paper, travel brochures, stickers and sticker waste, magazine rips, junk mail, catalogs, postcards, and a flea market frame, create this truly unique upcycle project.

miniature-quilt-design-scrappy-spider-web-by-terry-white

You Will Need:

  • 1/4″ graph paper to draft the design to complete a 3″ square (or copy and use the pattern provided).
  • Cereal box cardboard or cardstock for two scrap sheets, you will be making four 3″ squares out of the blue scrap sheet (each square makes two blocks). The yellow scrap sheet will be the background for the quilt and it should fit in your frame.
  • Scraps as described above. Enough to cover the two scrap sheets. Two sets of color were used in this project: blue/green and orange/yellow.
  • Fabrick contrasting to the blue/green – I used dark purple
  • Several sheets of copy paper
  • Glue
  • Marking tools – pen or pencil
  • Crayons, paints, color pencils and markers to add exra design, color and texture
  • Havel’s 60mm Jumbo Rotary Cutter, cutting mat and fabric ruler
  • Havel’s Non-Stick 9″ inch scissors
  • Flea market frame

Draft a 3″ Spider Web quilt block using 1/4″ graph paper. Make several copies on regular copy paper.

draft-3-inch-spider-web-quilt-block

Shade one of the copies to make a two-color block. Use this as your guide for making pieces and the arrangement of blocks.

shade-one-copy-to-make-two-color-block

Make blue and green scrap sheet. Use the cardstock as a base. Layer big scrap pieces and glue to sheet. Ad smaller pieces on top and add marks of color if desired. Press with a heavy book and let dry overnight.

make-blue-and-green-scrap-sheet

Make scrap sheet of yellow and orange pieces. This will be your background.
Glue big scraps down and glue to card stock. Press with a heavy book and let dry overnight.

make-scrap-sheet-of-yellow-and-orange-pieces

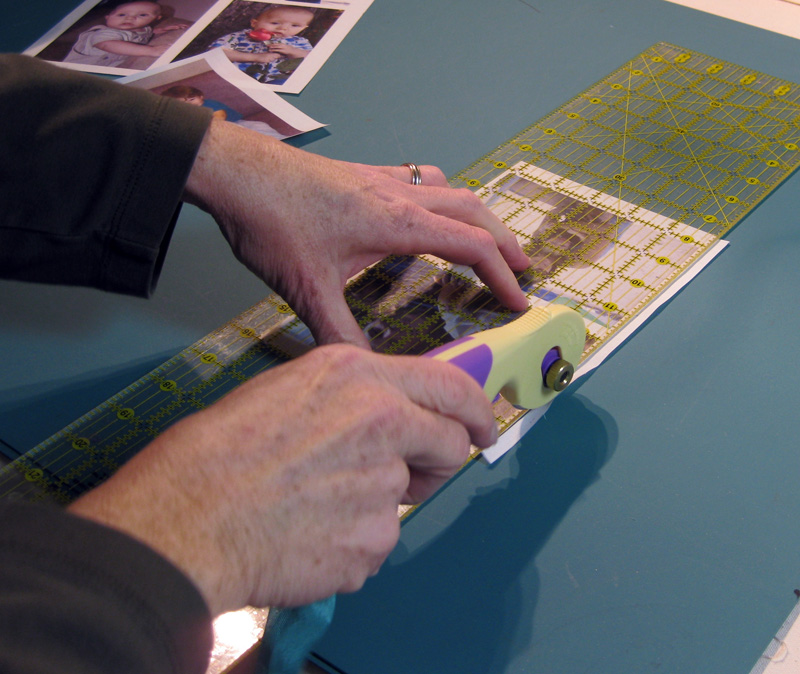
Cut 3″ fabric squares from a highly contrasting fabric. This is a dark purple hand dyed fabric.The hand dye adds extra texture to the design.

I use Havel’s Jumbo Rotary Cutter because it has a long lasting blade of
Japanese steel (I use this a lot!) and the ergonomic soft handle is easy on my hands.
Glue the fabric to a 3″ square of copy paper. This adds stability to the fabric.

cut-3-inch-fabric-squares-from-contrasting-fabric

Cut out and glue a copy of the spider web block to the back of blue/green scrap sheet. Cut out square. Make X marks to correspond with shaded pieces of quilt block design.

make-x-marks-to-correspond-to-shaded-pieces

Cut out the pieces with Havel’s Non-Stick Scissors. They are coated stainless steel, and isn’t that smart? The size makes it easy to cut through thick layers. The non-stick coating makes it easy to cut through sticky adhesive, paint, wax from crayons and layers of paper. The blades are serrated for a nice grip on various materials.

cut-out-the-pieces-with-not-stick-scissors

Arrange and glue the X marked pieces on one purple square.
Arrange and glue the unmarked pieces on the other purple square.

arrange-and-glue-x-marked-pieces-on-purple-square

Arrange and glue the quilt blocks onto the yellow scrap sheet. At this point make additions like corner squares and smaller scraps to add decoration. I cut the fish image from an ad in a travel brochure.

Press with heavy books – frame with flea market frame.

arrange-and-glue-quilt-blocks-frame-with-frame

Watch Terry’s instructional video for “Scrappy Spider Web”, below.


terry-white-threadpaint-artist-author

Terry White is a studio fiber artist. She has been doing this work since 1996, and she discovered the techniques she uses: threadpaint, machine appliqué, piece, quilt, embellish with beads, fibers and minutiae with sewing machine techniques, through experimentation and self-study.  Terry teaches these techniques through classes and videos.  Over the years Terry has been published in over 50 articles in magazines and books, including: McCall’s Needlework; Quilter’s Newsletter; Machine Embroidery and Textile Arts; CMA trade magazine; Stitch n Sew Quilts; Quick n Easy Quilts; Quilt World magazine and Calendar; Quilting Arts Calendar 2003; America from the Heart; America’s Best; America Sews.  She is a wife, stitcher, artist, sister, mother, friend, nana, gardener, baker, writer, student, teacher and American.  See more of Terry’s work at www.threadpaint.com.


9-inch-non-stick-scissors-cta-terry-white


Posted in Fabric, Fabric Scissors, Free Quilt Projects, Fun Stuff, Guest Writers, New Products, Patterns, Reviews, Terry White, Tutorials, Uncategorized, Wall Hangings | Tagged , , , , , | 61 Comments

How to Make A Travel Art Bag & Journal

By Liz Kettle

Summer traveling is just around the corner. Create something special for your kids (or yourself), to keep them occupied on the road, or in the air.

This project is great for Tweens and Teens to make on their own or with Mom, and is an easy introduction to the world of fabric art!

travel-art-bag-and-journal-by-liz-kettle

Everyone loves getting new stuff for a trip, especially if it is made just for us. This travel art bag easily holds everyone’s favorite supplies and a special journal to record favorite parts of your trip, or for keeping kids occupied in the car to thwart that universal question “Are we there yet?!”

Supplies for Art Bag & Journal:

Art Bag Directions:

1. Choose your fabrics. The case is made from just one piece of MPC that is folded so if you have a directional print like I do, you will want to cut it and piece the pieces to ensure the print is the proper direction when the flap is folded over. If you don’t have a directional print simply cut your fabric to 11″ x 22 1/2″, using your Havel’s rotary cutter with straight blade, fabric ruler and cutting mat.

choose-your-fabrics-for-journal

2. If you do have a directional print you will want to cut the main piece 11″ x 14″ and the piece that is for the front flap 11″ x 8 ½”. In this sample the blue fabric is the back and flap of the bag. The print is the front. I always test fold to make sure I have my fabrics going the right way.

Fuse the front fabrics to the Multi-Purpose Cloth with Misty Fuse or other fusible web. I like Misty Fuse because it doesn’t add extra stiffness to the project

3. If you have multiple fabrics for the cover it is a good idea to add stitching to secure the seams because this little art case will be hauled everywhere. I added a decorative satin stitch but any stitching would work just as well.

4. Fuse a piece of fabric to the inside of the bag cover. If desired, edge stitch the short edges of the bag. I used a satin stitch. You could simply straight stitch to ensure the fabric is firmly attached to the MPC base.

fuse-fabric-to-bag-and-stitch

5. Add the Velcro for the bag closure. Place the stiffer side on the front of the bag and the softer side on the top flap area. Center the Velcro 2″ down from the top edge of the bag front. Stitch in place.

place-stiff-velcro-to-front-of-bag

6. Center the softer side on the inside of the bag flap 1″ from the bottom of the flap. Stitch in place.

center-soft-velcro-inside-bag-flap

7. Optional: I created a flap to hide the stitching from the Velcro. It is just for fun and not a critical part of the bag. I just love this little owl and wanted to give him a starring roll. Cut two pieces of fabric 3 1/2″ x 3″. With right sides together stitch around three sides using a ¼” seam allowance. Trim the corners.

created-flap-to-hide-velcro

8. Turn right side out, fold in the open end, press and stitch closed.  Top stitch around the outside edge.

turn-flap-right-side-out

9. Place on the outside of the flap section and stitch in place.

place-flap-outside-over-velcro-stitch-in-place

10. Load the skip cutting blade into your Havel’s rotary cutter.  Cut along the length of the fabric 1/4″ from each long edge and the front edge.  The skip blade will make tiny slits along the edge but not cut off the fabric.  Press firmly to ensure you go through all layers of fabric.  you cannot re-cut if you don’t go through all layers.  For this reason, I suggest that you practice on a scrap of MPC layered with fabric to get the feel of how hard you have to press to go through all layers.

use-skip-blade-in-rotary-cutter

11. In this photo you can see the little slits created by the skip blade.

slits-created-by-rotary-blade

12. Next we will lace up the sides of the case.  I used a firm ribbon for this case, but I have also used ripped strips of fabric, rayon seam tape and thick yard.  The ribbon and seam tape give the most polished look and the ripped fabric the most casual look.  Ripped fabric strips, ribbon or seam tape should be between 1/2″ and 5/8.

lace-up-sides-of-case

13. Fold the bottom half of the case up 8 1/2″.  Cut the ribbon about 24″ long.  Thread your ribbon or fabric strips onto your large needle and knot the end.  Begin at the very bottom of the case and insert your needle from the inside of the case to bring it out on the backside at the lowest slit created by the skip blade.

fold-bottom-of-case-and-lace

14. Use a simple whip stitch all the way up the side of the case, around the flap edge and down the other side.  Simply thread the needle through the slits along the edge bringing the needle in from the front of the bag and out the back, lining up the slits.  Stitch up the side past the folded section of the very end of the flap.

15. Knot the ribbon or thread the ribbon tail back down the edge inside the previous stitching.


My Very Own Journal

This little journal is so easy to make you won’t mind making them for all your friends and their kids! It’s another fun craft project to introduce you more to the world of fabric art!

Journal Directions:

1. Cut a piece of MPC 8 ¾” x 12″. Cut your cover fabric the same size. Fuse the cover fabric to the MPC base. Fold the book cover in half and press to crease.

2. Use the skip blade in your Havel’s rotary cutter and run it down the crease. Feel free to mark the line with a pencil if desired.

use-skip-blade-in-rotary-cutter

3. Thread the ribbon through the slits leaving a tail on each end. Stitch around the outside with a straight or decorative stitch, catching the ends of the ribbon to secure them.

thread-ribbon-through-slits-leaving-tail

thread-ribbon-through-slits-leaving-tail

4. Fold the paper in half to create 5 ½” x 8 1/2″ size pages, creasing well. Nest three pages together to create a ‘signature’. You will have 3 signatures of 3 pages.

fold-paper-in-half-creating-3-signatures

5. Set your machine straight stitch to the longest length. Place one of the signatures just to the right of the ribbon on the inside of the book cover. Use binder clips to hold in place if desired. Stitch down the inside crease of the signature. Repeat for the remaining two signatures; one in front of the ribbon embellishment and one behind the first signature.

Now you’re ready to fill it with doodles and dreams.


fiber-artist-liz-kettle

Liz Kettle is a textile and mixed-media artist who loves sewing and creating with fabric and thread. Sharing sewing joy and thread addiction with others makes her deliriously happy. Liz is co-author of two best selling books: Fabric Embellishing: The Basics and Beyond and Threads: The Basics and Beyond.  Share Liz’s stitch journey on her website and blog at www.TextileEvolution.com.


4-easy-sewing-craft-projects-by-liz-kettle


Posted in art ideas, craft, Craft to make, Fabric Rotary Cutters, Fun Stuff, Liz Kettle | Tagged , , , , | Comments Off on How to Make A Travel Art Bag & Journal

Free Quilt Project: Pineapple Wall Hanging

By Beth Novak

The pineapple is a symbol of friendship and hospitality, making this quilt a welcoming addition to your home.

pineapple-wall-hanging-beth-novakThis quilted wall hanging would look great in your foyer, adapted as a table runner for your dining room table, or even made into a pillow for a housewarming gift.

I’m also a big fan of Hawaiiana, so until I master Hawaiian appliqué, this is my tribute to my favorite state! Also, check out my blog for a variation on this block – especially for those of you who prefer peacocks to pineapples!

Supplies:

  • Scraps at least 2.5″ square of tan, yellow, gold, or brown fabric
  • Scraps at least 2.5″ by 5.5″ of green fabric
  • Solid white fabric or the background fabric of your choice
  • Backing, binding, thread
  • Rotary cutter, ruler, cutting mat, and sewing machine

1. Cut enough yellow, brown, tan, and gold scraps to make sixteen (16) 2.5” squares.

cut-16-fabric-squares

2. Let’s make quick half square triangles! This method will make enough corners for two (2) pineapples. Cut out one (1) white 5.5” square and also one (1) yellow, brown, tan or gold 5.5” square.

3. Lay the white 5.5” square on top of the color 5.5” square, right sides together. Using a ruler, draw a line from corner to corner, making an X through the center.

lay-white-square-on-top-of-color-square

4. Sew 1/4” on either side of each line (4 seams per pair).

sew-quarter-inch-seam-on-each-line

5. Cut on the center point both horizontally and vertically.

cut-on-center-point-horizontally-vertically

6. Now cut diagonally following the lines you drew earlier. Voila! Eight half square triangles!

cut-diagonally-following-lines

7. Press your seams away from the white.

press-seams-away-from-white

8. Now assemble your pineapple “body.” Using a 1/4” seam allowance, sew together five (5) 2.5” squares. Repeat, making two rows.

assemble-pineapple-body

9. Sew together three (3) 2.5” squares. Sew one half square triangle unit to the top (so the color triangle is on the bottom right), and sew one half square triangle to the bottom (so the color triangle is on the top right).

Repeat.

10. Sew one complete row to the other complete row on the long edge, using 1/4” seam allowance. Add a half square triangle row to one side making sure the white portions of the half square triangles are on the outside.

Repeat, sewing a half square triangle row to the other side.

11. Cut two pieces of white 3.5” by 10.5”. Using 1/4″ seam allowance, sew a piece of white to either long side of your pineapple body.

12. Now for the stem. From your green scraps, cut nine (9) 2.5” by 5.5” rectangles.

13. Fold one scrap in half lengthwise and finger press. Line up your ruler so the 1/4” mark goes through the center point at the bottom, and aligns with the top edge forming a diagonal.

fold-scrap-in-half-lengthwise-and-finger-press

14. Trim along this edge and then repeat for the other side. This should yield a wedge that is 1/2” at the bottom and 2.5” at top (and still 5.5” tall).

Repeat this with the rest of your green pieces.

trim-edge-repeat-other-side

15. Fold one wedge in half lengthwise right side together. Sew a 1/4” seam along the wide edge of the wedge.

Repeat this with the rest of your green pieces.

fold-wedge-in-half-lengthwise-right-side-together

16. Turn right side out to form a “point.” You may need to use Havel’s Laying Tool or your scissors to poke out the point, just be careful not to poke through the fabric if you use scissors!

turn-right-side-out-to-form-point

17. Press flat, creating a petal.

press-flat-creating-petal

18. Take two wedges and place right side together. Sew a 1/4” seam on one long edge. Press seam open.

place-two-wedges-right-side together

19. Repeat with all petals until you have a fan.

repeat-with-all-petals-till-you-have-a-fan

20. Cut a piece of white 6.5” by 14.5”. Fold in half and finger press, then open and place the fan so the center petal aligns with the center crease.

Note: do not align the bottom of your fan to the bottom of the white fabric. Instead, align it so that the arch made by the bottoms of the petals will be completely hidden in your seam allowance.

Pin really well. (You’ll be happy you did later!)

cut-piece-of-white-fabric

21. Appliqué the petals to the background fabric by stitching between 1/4” and 1/8” from the edge of the petals.

applique-petals-to-background-fabric

22. Trim the bottom edge so the green fabric is even with the white.

trim-bottom-edge

23. Placing the fabrics right sides together, align the bottom of the appliquéd petals to the top of your pineapple body. Sew 1/4” seam. Press.

align-bottom-of-appliqued-petals-to-top-of-pineapple-body

You will now have created one pineapple block!

make-four-units-for-wall-hanging

To create the wall hanging: make a total of four of these units.

Stitch two pairs together along the long edge making two horizontal rows of pineapples.

Add a 2.5” by the width of the row (approximately 28”) piece of fabric to the bottom of each row.

Back, quilt, and bind.

You’re now done! Thank you for checking out my tutorial and I hope you enjoyed this fun and summery quilt project!

If you have any questions email me at modernJax@gmail.com.


beth-novak-headshotBeth Novak is a mother, wife, sewist, blogger, and comedienne (in her own mind) living in southeast Ohio. She also finds time to work full time as a professor of digital media. Contact her at modernJax@gmail.com, or find her on FlickrTwitter, and Pinterest, too!


havels-sewing-fabric-quilt-ruler-cutter


Posted in Fabric, Free Quilt Patterns, Free Quilt Projects, Fun Stuff, Guest Writers, Quilting, Tutorials, Uncategorized, Wall Hangings | Tagged , , , , | 4 Comments

Free Project: How to Make a Memory Book

by Liz Kettle

Make a Marvelous Memory Book to celebrate that
special occasion or person in your life.

how-to-make-memory-book-1-liz-kettle

For those people for whom we would like to create something special rather than grab another gift card from the sea of choices, a fabric memory book is my favorite gift. Fabric memory books are a cross between a photo album and a scrapbook. But because they are made with fabric, they are soft, tactile, and ask to be handled and loved in a way that paper books do not.

I have made these little books to commemorate a special trip, event, or a special person in my life. Memory books can be made in any style and they can be embellished as much as you like. They are always a hit with the recipient and each one is a unique gift. Best of all, they can be made in a day!

Supplies:

*if you aren’t able to print photos on your printer you can use traditional photos printed on paper but they won’t be quite as durable. Attach them with double stick tape before stitching around the edge.

Steps:

1. Decide on the size of your finished book. Mine is 6” high by 8” wide. Using your rotary cutter, ruler and mat, cut your canvas to the height of the page you want and double the final width. My canvas is 6” high by 16” long. I cut 3 pieces of canvas to give me 10 inside pages and a front and back cover.

 2. Print your photos on your inkjet printer using a prepared for printing fabric. I prefer Premium Cotton Lawn by The Electric Quilt Company because it has a very fine weave and the photos print clear and crisp but other prepared for printing fabrics work well in this sort of project. Refer to manufacturer’s directions for rinsing and heat setting. I printed my photos at 3 ½” x 5”. If you are making a smaller or larger book you can scale your photos accordingly. At the 3 ½” x 5” size 4 photos will print on one sheet of prepared for printing fabric.

memory book 2 edited-sm

3. Cut Misty Fuse or other fusible web 8 ½” x 11” and adhere to the back of your photo printed fabric. One of the reasons I prefer Misty Fuse is that it is very lightweight and doesn’t change the hand of the fabric as much as other fusible webs. It does present a challenge in photos though. If you look closely you can see the light web on the back of the photos. Use a Teflon craft sheet or parchment paper to protect the iron from the fusible web. Iron on top of the craft sheet. This step is called pre-fusing. The fusible is attached to the fabric back and will reactivate when you are ready to fuse it to another fabric.

memory book 3_edited-sm

4. Using your rotary cutter trim the photos as desired. I wanted to keep the snapshot feel of my photos so I left a 1/8” white border around each photo. You could trim the photos to the edge or cut out around figures and images.

Memory book 4_edited-sm

5. Now, gather fabrics which relate to your theme. There are no rules here. You can use a wide variety of fabrics including quilting, home décor, clothing scraps, fancy fabrics etc. My theme is my grandson Zakary. I chose boy type fabrics in bright colors. I ended up not using a wide variety of colors in my book but you can have every page different in your book if you chose. I often choose fabrics that relate to the photo. Don’t get too caught up in finding the perfect fabric…sometimes matching is not as effective as slightly miss-matched.

memory book 5_edited-sm

6. Decide the order your photos will appear in the book and begin designing pages. I start with a background fabric and then choose a fabric to go directly under the photo. Often, I will add more than 2 or 3 fabrics to a page but it depends on the theme and how complex I want the final book to be.

memory book 6_edited-sm

7. Use your rotary cutter to cut your background fabric to size or you can take the more casual route and rip your fabrics. I chose to rip my fabrics because frayed edges seemed appropriate for a little boy theme. For a no math approach to design I simply layer my fabrics and images and eyeball how big I want my pieces of fabric to be. Then, I use my 8” sewing scissors to just snip a tiny bite into the fabric where I want to rip it. You don’t want to make a big cut into the fabric or you will have a section of fabric that is cut straight and not ripped. I love how sharp these scissors are all the way to the tip. I rip fabric a lot because I love the frayed edge and it is frustrating when your scissors don’t cut at the very tip.

memory book 7_edited-sm
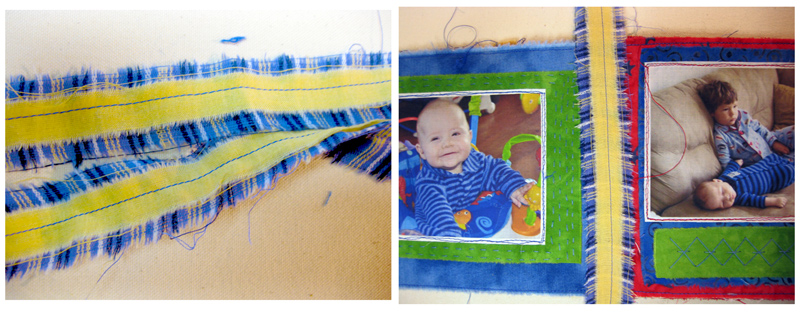
8. You can work on one page at a time but I usually do all of my designing at once. I lay out all the pages, in the order they will go in the book and cut or rip all of the fabrics to size. When you are happy with the page designs cut pieces of Misty Fuse for the layer of fabric that is under the photo and any other layers you have added. Build your design from the bottom page base up to your photo on top and iron to fuse both layers to the base fabric at the same time. For these additional layers of Misty Fuse and fabric I simply place the Misty Fuse between the layers of fabric. You could pre-fuse each one if you prefer. To clarify this layer approach: I have my base layer of fabric, a piece of Misty Fuse cut to the size of the second layer of fabric, the second fabric, the photo which is pre-fused goes on top and I iron them all at the same time.

9. Next, I add some machine stitching. I chose to simply machine stitch around each of the photos. I used a free motion foot with the feed dogs lowered because I wanted to have a more casual feel to the stitching. You could stitch with the feed dogs up and use a straight or decorative stitch for different effects. You could stitch around each layer of fabric as well as the photo.

memory book 7-5 ed sm

 10. Now we are at the fun embellishment stage. I wanted to keep my book simple this time so I opted for some hand embroidery. I love how much texture you add with simple running and cross stitches. There are many ways to embellish your book. I will often print quotes or descriptions on fabric to add to my pages. You can add beads, found objects, lace, trims and so much more. At this point keep any hard embellishments clear from the edges.

memory book 8_edited-sm

memory book 9_edited-sm

11. After you have added your embellishments we simply need to add our pages to the book base. Lay out your pages in order so you don’t get confused. Cut Misty Fuse to the size of your canvas page bases; 6” x 16” for my book. You need one piece of Misty Fuse for each side. Begin with the front/back cover piece. Layer the canvas with the Misty Fuse and layer your photo collages on top.

Memory book 10_edited-sm

12. Iron to fuse the layers together.

Memory book 11_edited- sm

13. Turn the canvas over and layer another piece of Misty Fuse and your 1st inside page collage and your last inside page collage side by side. Iron to fuse the layers together. Repeat with all the remaining canvas page bases taking care to keep your pages in order. When all the pages are finished they will be stacked on top of each other so you may want to make a note of the page order in relation to which side of the canvas they go on. It can be a little confusing your first time as you can see in the photo above the second set of pages should be flipped over before I sew them.

memory book 13 edited -sm

14. After all your pages are fused together you will stitch around the edge of the pages. I used a straight stitch but you could use a decorative stitch that goes with your theme. Don’t forget that your bobbin thread will be the thread that shows on the other side of the page.

Memory book 14 _edited-sm

15. The last step is to assemble your book. Layer the pages together in order with the cover first, then the second set of pages and finally the middle pages. Double check to make sure they are in the proper order. I confess in my excitement to finish, I stitched one page upside down…I should have looked closer at my photo in step 13! That gave me an excuse to use my awesome sharp Havel’s seam ripper. Fold the book in half and press to mark your stitch line. Stitch a straight stitch down the fold line through all 3 page sets of your book. Close the book and press again.

16. As a last little optional embellishment I like to add a strip of fabric, ribbon or trim to tie around the book. This covers any exposed canvas. I stitched a piece of yellow fabric to a piece of plaid. Lay the fabric or ribbon along the middle page. Turn the book over and tie in a square knot or bow. The perfect gift!

how-to-make-memory-book-15-and-16-liz-kettle-800x313memory book 17_edited-sm


Liz Kettle

Liz Kettle is a textile and mixed-media artist who loves sewing and creating and sharing that joy with others. She is co-author of two best selling books: Fabric Embellishing: The Basics and Beyond and Threads: The Basics and Beyond.  Share Liz’s stitch journey on her website and blog www.TextileEvolution.com


60mm rotary and liz kettle memory book_cta_400x282


Posted in For Beginners in Sewing, Holiday Projects, Liz Kettle, Uncategorized | Tagged , , , | 4 Comments

How To Make Basket Weave Pillows

By Beth Novak

bigstock-image-colorful-pillows

Use colorful fabrics, and textured fabrics for your pillows. How about monochromatic pillows? Your only limit is your imagination!

*Editor’s Note: We are well into spring and summer is just around the corner. Getting an itch to freshen up your rooms or patio? Need to add a pop of color to a drab room? MAKE PILLOWS! You can create a multitude of pillows using various colors and fabrics, add texture and whimsy using your own unique embellishments. Pillows are an easy way to freshen up your rooms depending on the season or holiday. So while this article describes how to make a Halloween pillow, put your imagination to the test, the possibilities are endless!


After the heat we’ve had in the Midwest this summer, the lower temperatures we’re currently enjoying have me thinking of apple cider and hayrides. And, naturally, that makes me want to break out the Halloween decorations!

Of course, you don’t need to dig into your stash of Halloween fabrics if you’re not quite ready. These basket weave pillows would look great in your favorite coordinating line of fabrics! Or, if it’s more your thing, as scrappy as you want to make them!

Basket Weave Pillows

Supplies:

ban_sept_2

  • At least five coordinating fat quarters (The more fat quarters you use, the scrappier your finished pillow. By using six fat quarters you can make two complete pillows!)
  • Lightweight fusible interfacing
  • Thread
  • 16” x 16” pillow form
  • Rotary cutter, fabric ruler, cutting mat, sewing machine, & iron

1. Select four of your fat quarters (we will use the fifth for your sashing) and cut two 2.5” x (app) 22” strips from each. If you have more than five fat quarters, cut a total of
eight strips.

2. Take two strips and place right side together. Sew a 1/4” seam on the long edge.

3. Press your seams open or to the darker side, whichever your preference.

4. Repeat, adding a third and fourth strip.

5. Repeat steps 2 through 4 to complete a second set of four strips.

6. Each set of four strips should be 8.25” wide by approximately 22” long. From each set, cut two squares 8.25” x 8.25” for a total of four squares. If your seam allowance is slightly off, your strips might not be quite 8.25”. It’s not the end of the world. Simply cut your squares down so they are square (8” x 8” or whatever gets you a square). You can make up the difference in the sashing.

7. Arrange your four squares in a basket weave pattern, first row: one horizontal, one vertical; second row: one vertical, one horizontal.

8. Starting with the first row of two squares, stack squares right sides together. Using 1/4″ seam, sew together squares. Repeat with the bottom row of two squares. Press.

9. Rights sides together, place the top row on the bottom row. Pin well (or at least where they meet at the center seam). Sew together with a 1/4″ seam. Press.

10. Place your basket weave square on your cutting mat, with each point along the vertical
or horizontal 12” line on your mat.

ban_sept_9_edited

11. Cut your basket weave into a smaller 12” square along the vertical 6” and 18” lines and the horizontal 6” and 18” lines. Save your triangle scraps for another purpose and set aside your square.

ban_sept_11

12. From your fifth (unused) fat quarter, cut four strips 2.5” x 22” (if your basket weave square is less than 12”, cut your strips 3” instead of 2.5”).

13. Place one strip along the top edge of your basket weave square right sides together. Sew together with a 1/4″ seam. Press and trim 2.5” strip to the length of the basket
weave square.

14. Repeat step 13 along the bottom of the basket weave, and then the left and the right. Now you have a basket weave block!

ban_sept_14

I like to change out my decorative pillow covers seasonally. Let’s reinforce the pillow’s seams and create an envelope back for easy in-and-out.

15. Cut your fusible interfacing to about 15” squares, and apply it to the center back of your pillow block. This will keep your seams stress free when you change your
pillow cover.

16. Choose two of your remaining fat quarter pieces. Each piece should now be about
13“ x 22”. Trim to 13” x 16”.

ban_sept_16

17. On each 13” x 16” piece, fold over one long edge about 3/8” and press, then fold over another 3/8” and press again.

18. Sew a 1/4” seam along the folded edge to finish it. Repeat with second piece. These will form your envelope back.

19. Lay your pillow block face up, then layer one envelope back piece on top, matching the unfinished sides and bottom. The finished edge should lie across the pillow block.

20. Repeat step 19 with your other envelope back piece, matching the unfinished sides and top. Again, the finished edge should lie across the pillow block. Pin in place.

21. Sew a 1/4″ seam along all four edges of your pillow cover. I like to go over the seam again for strength.

22. Turn pillow cover right side out, poking corners out. Insert your pillow, and enjoy!

ban_sept_21


Beth Novak headshot

Beth Novak is a mother, wife, sewist, blogger, and comedienne (in her own mind) living in southeast Ohio. She also finds time to work full time as a professor of digital media. Contact her at modernJax@gmail.com, or find her on FlickrTwitter, and Pinterest, too!


havels-sewing-fabric-quilt-ruler-cutter


Posted in Embroidery, Fabric, For Beginners in Sewing, Free Quilt Patterns, Free Quilt Projects, Free Sewing Project, Fun Stuff, Guest Writers, Holiday Projects, Patterns, Pillows, Quilting, Tutorials, Uncategorized | Tagged , , , , | 3 Comments