Create a Personalized Yoga Mat Carrier

LesiBy Leslie Jenison

An easy craft project to use up your fabric leftovers!

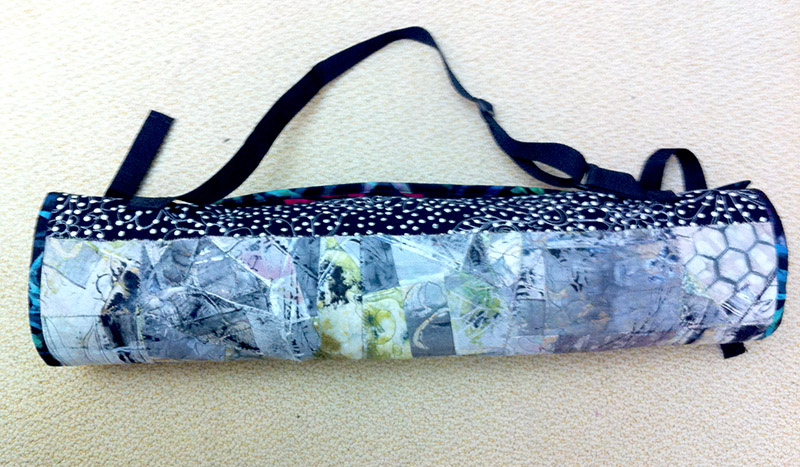
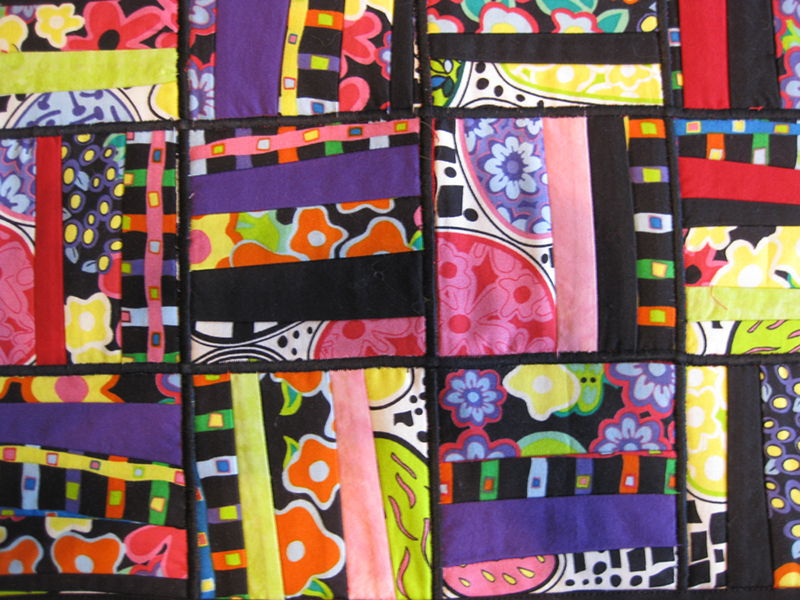
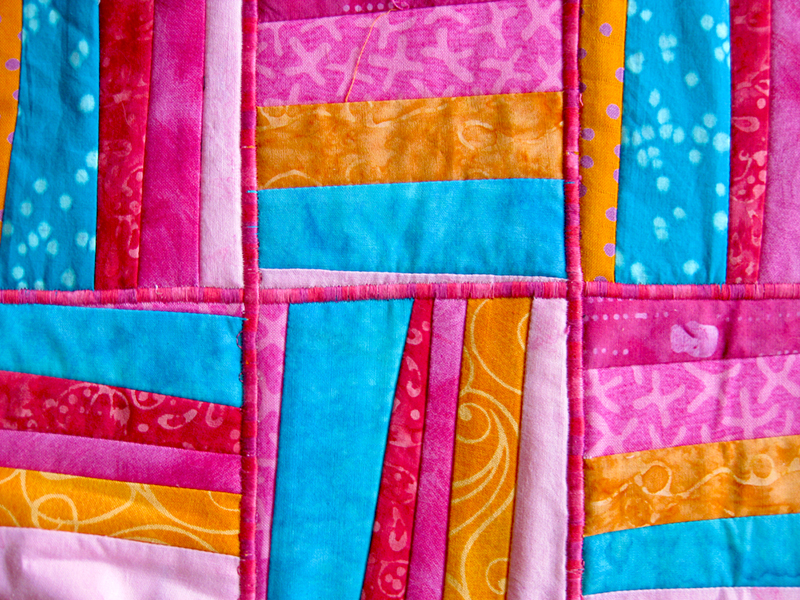
For a long time I have been in the habit of saving my quilted “trimmings” – those hunks that are cut off a quilt construction for one reason or another. I decided to make a new construction from these leftovers in the form of a yoga mat carrier.

To make the carrier, I rolled up my yoga mat and measured the width of the mat as well as the circumference of the rolled mat. I decided I wanted the carrier to be 26″ long by 18″ wide, which will allow for the rolled mat plus a bit of room for something else to be rolled in with the mat, if desired.

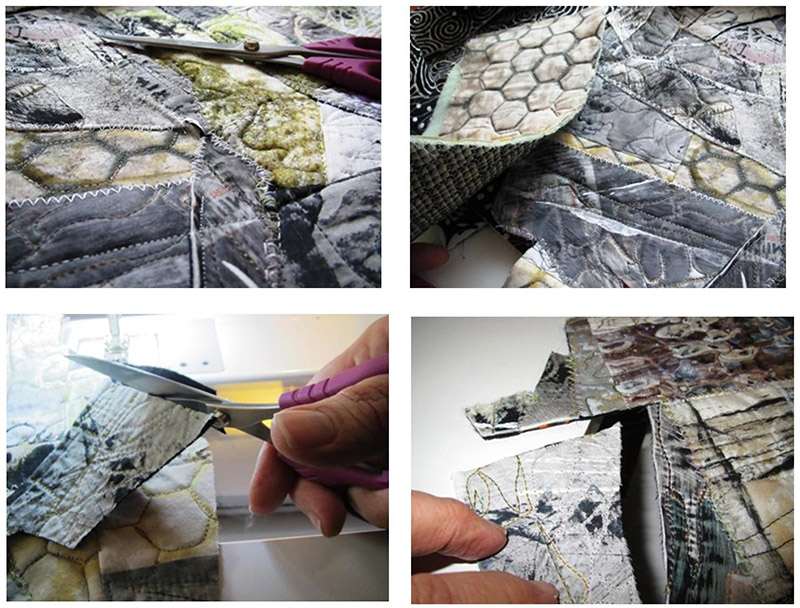
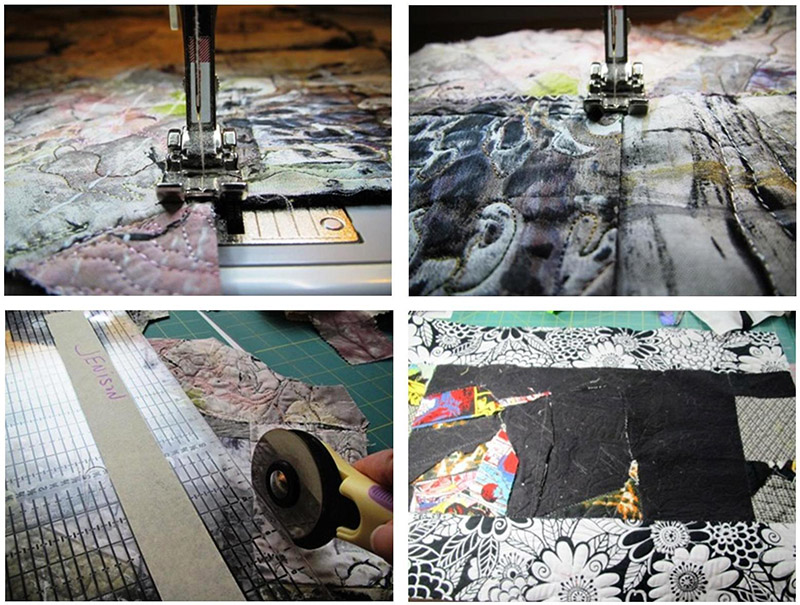
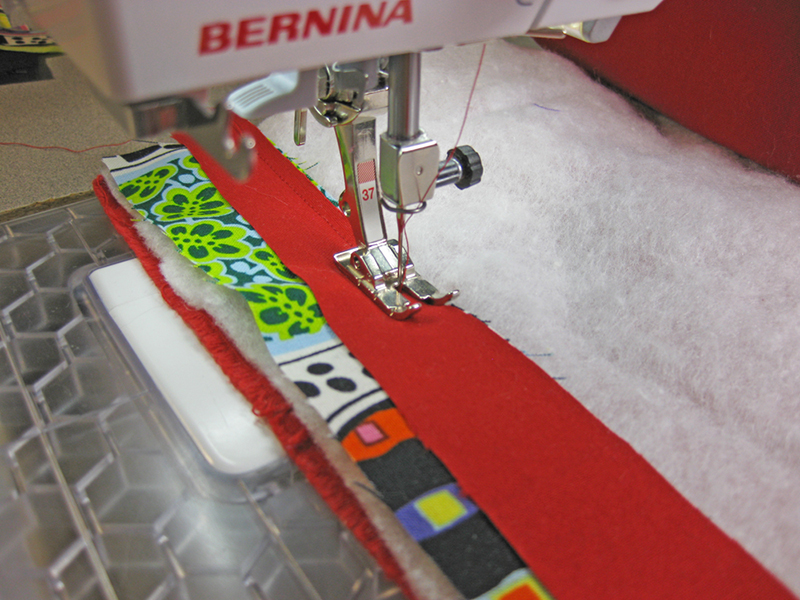
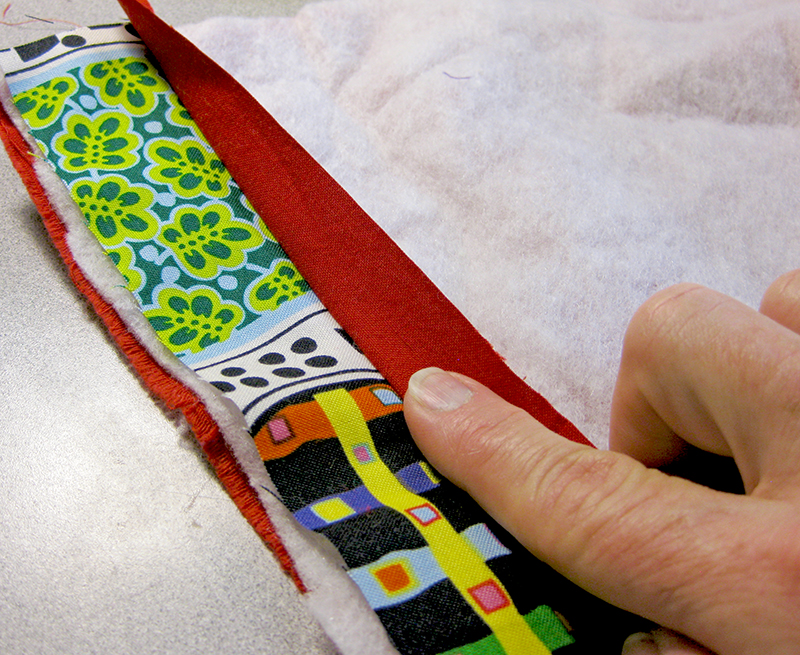
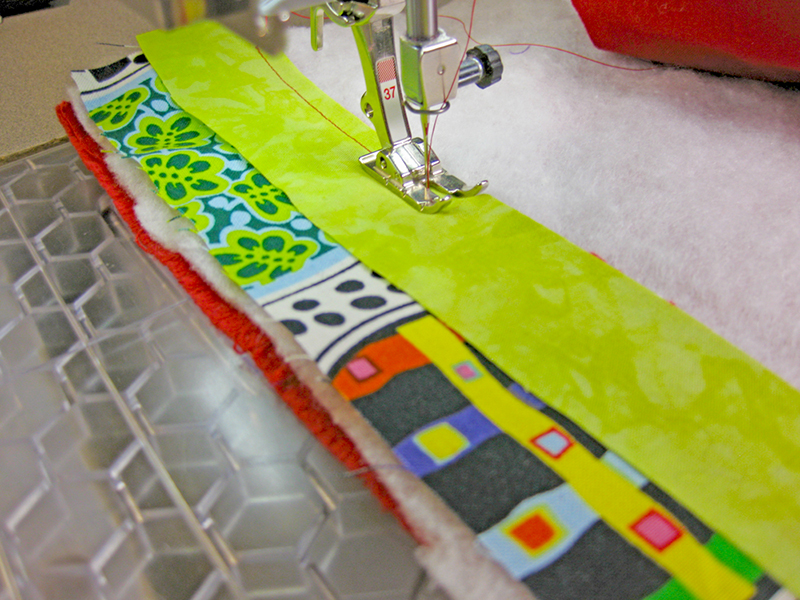
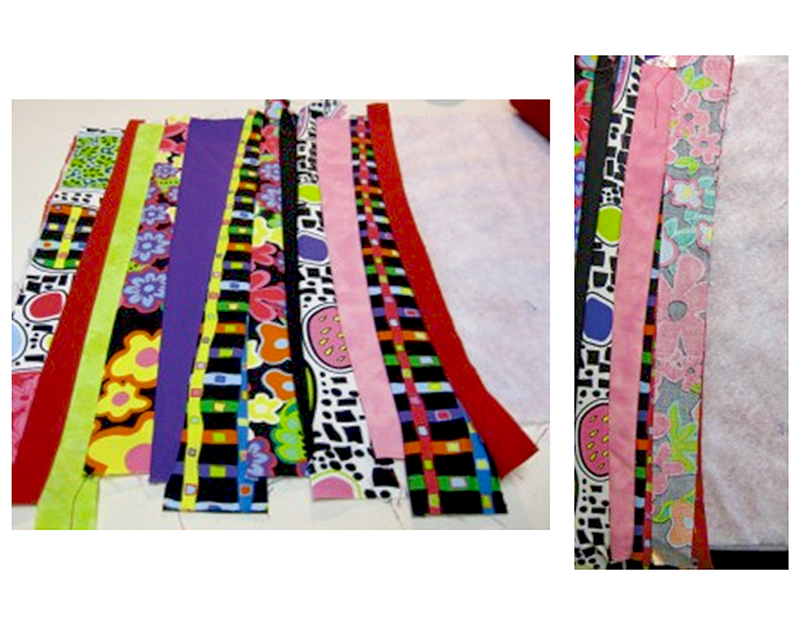
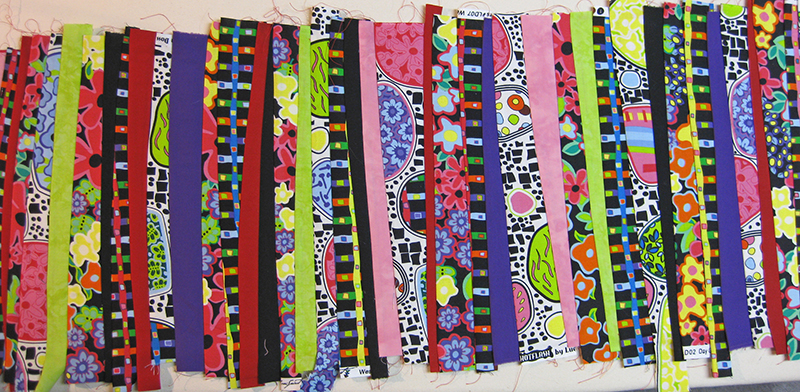
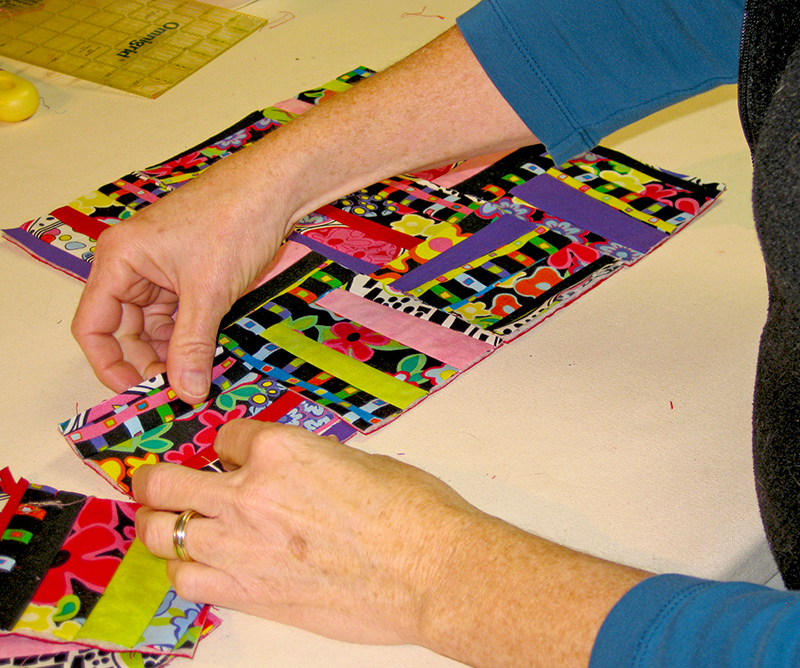
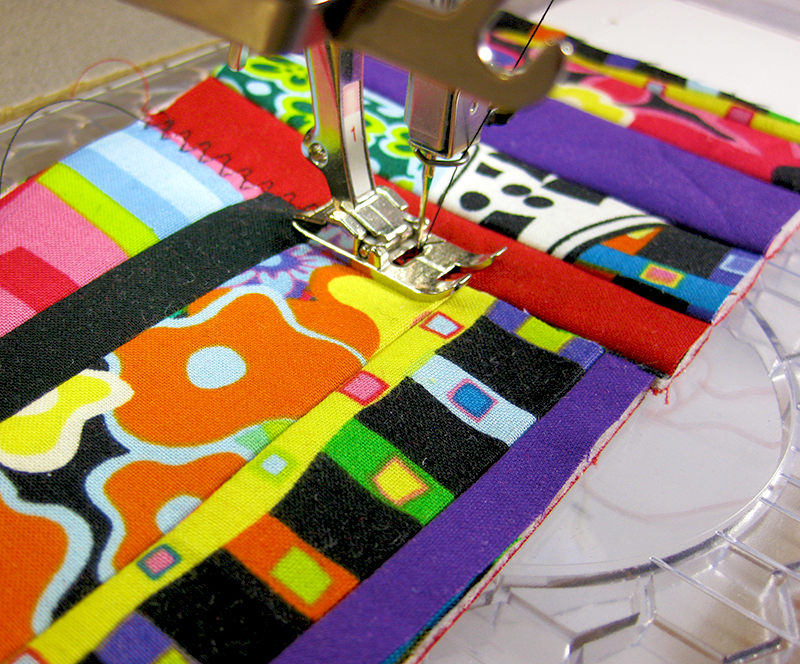
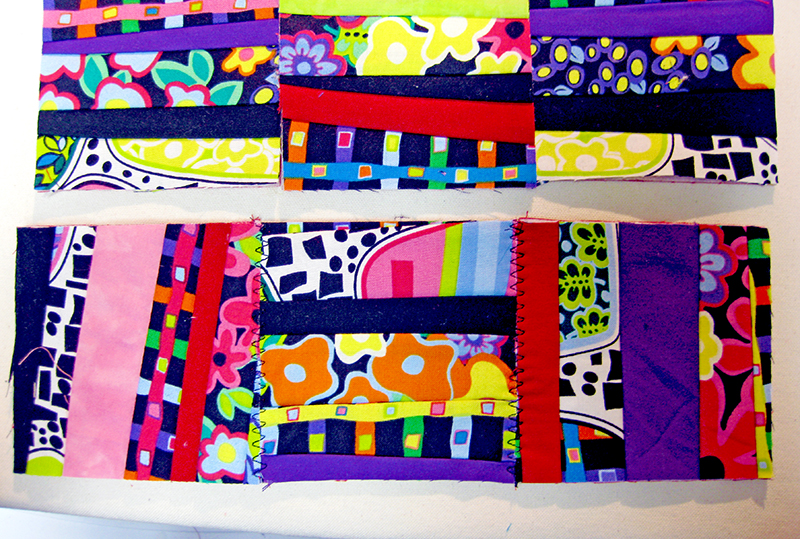
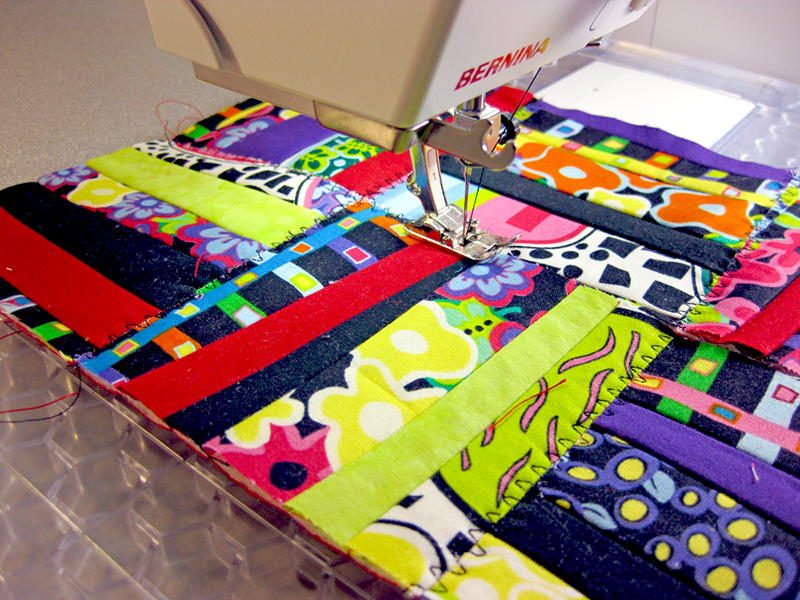
I went digging through my scraps and began to randomly piece sections together with a zigzag stitch.

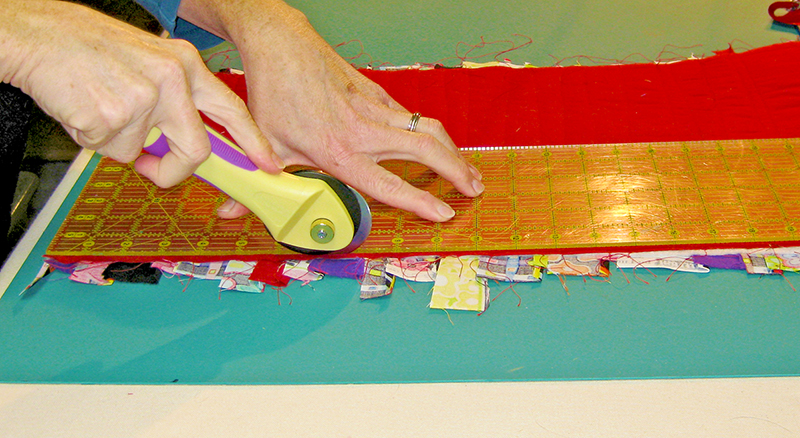
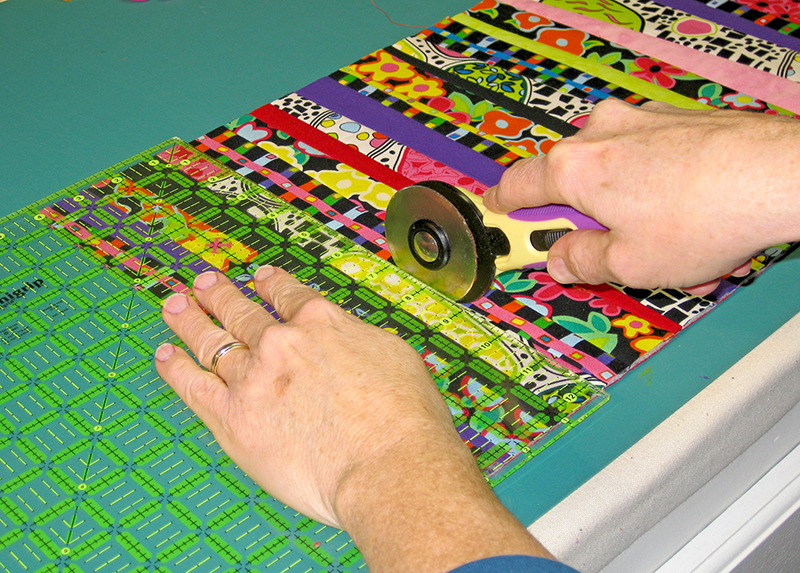
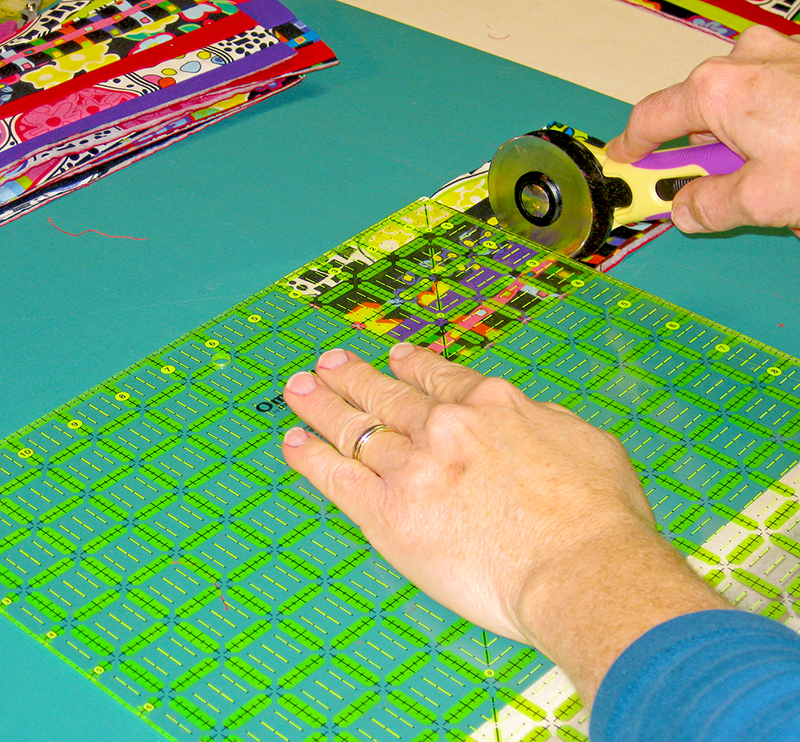
Personalized Yoga Mat Carrier Images 1-4Once a large section of the pieces was joined together, I stopped to trim them. I eventually achieved the size I desired for the carrier.

Yoga Mat Carrier by Leslie Jenison - Images 5-8

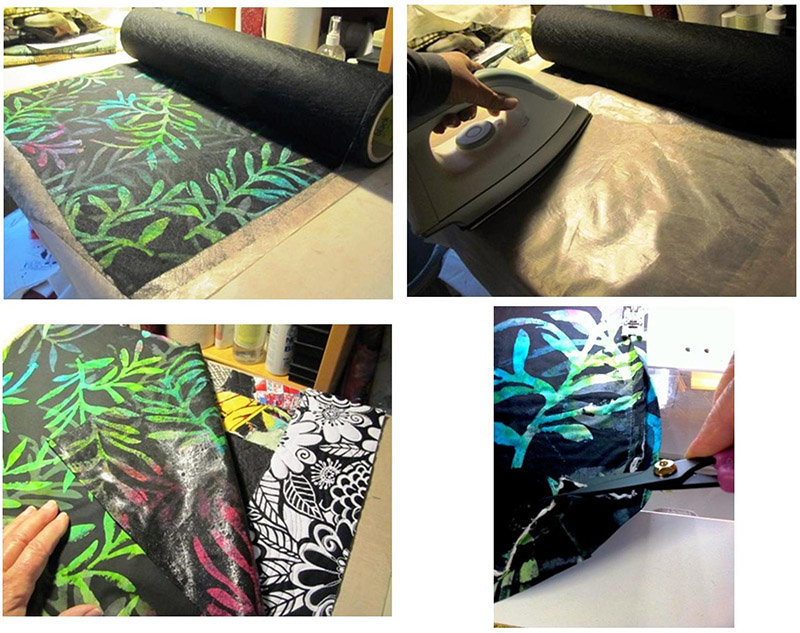
To improve the inside appearance of the carrier, I fused a piece of cut to size Hoffman fabric to the inside of the carrier and trimmed the edges. This also helped increase the overall strength of the construction.

Yoga Mat Carrier by Leslie Jenison - Images 9-12

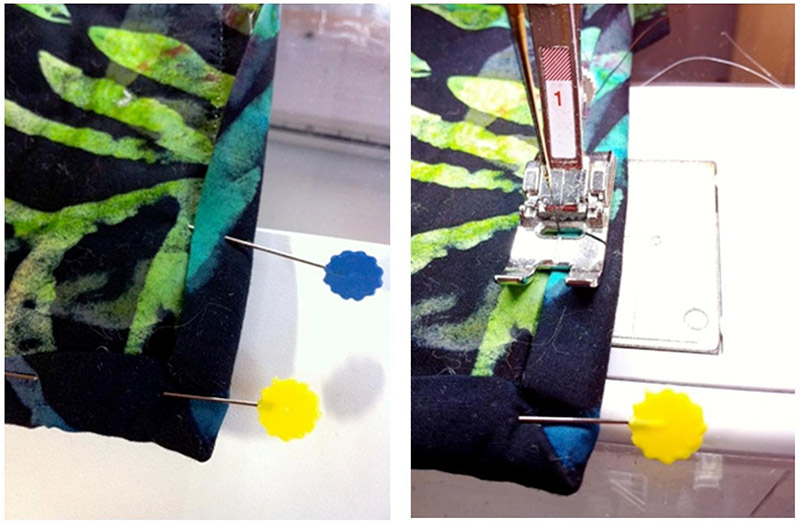
Cutting strips of the same cloth 1 /12″ wide, I joined them end-to-end, to create a binding for the carrier. I pressed both edges of the long strip toward the center.

Beginning on the “right”, or outer side of the carrier, I stitched the binding down 1/2″ from the edge using a dark top thread and Superior Monopoly thread in the bobbin.

Once the binding was stitched all the way around the edges, I flipped the carrier – taking care to fold the binding over tightly. I then stitched the inside of the binding in place very close to the edge.

The clear monofilament thread is now what is showing on the outside of the carrier. Since the stitch line is so close to the edge of the binding, it is now virtually invisible. The result is a nicely finished edge that is sturdy!

Note: trimming the corner- both cloth & batting- at a 45 degree angle makes turning the corner binding  much easier!

Yoga Mat Carrier by Leslie Jenison - Images 13-14

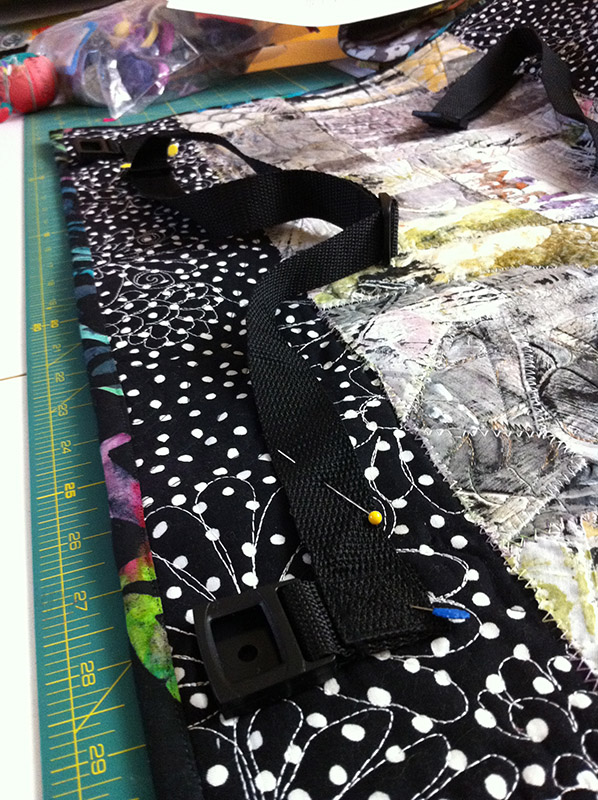
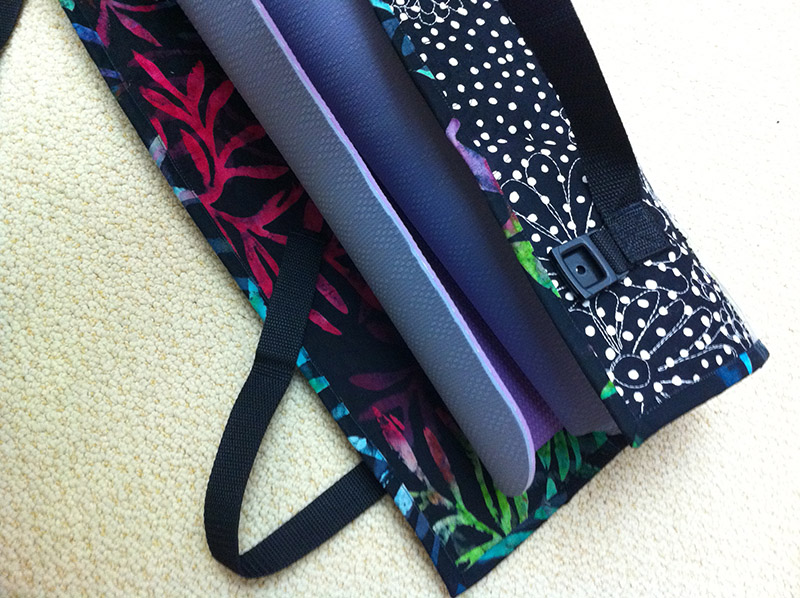
I had already purchased a set of strapping designed to fit around a yoga mat. (This one has a handle between two sets of adjustable clips.) I positioned the handle along one side of my mat and pinned it into place.

Yoga Mat Carrier by Leslie Jenison - Image 15

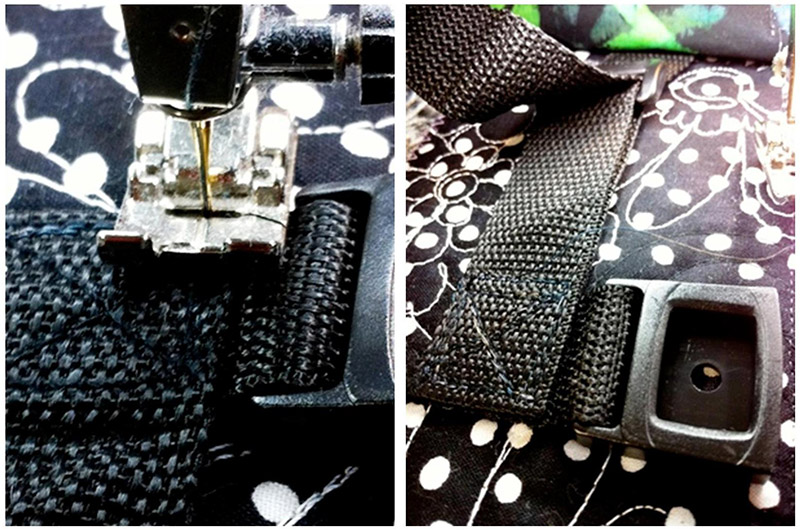
I then cut the male portion from the handle. Next I folded the cut end and stitched the strapping to ensure it wouldn’t fray.

I  positioned the clasps 4″ from the edges on the opposite side of the carrier, pinned into place, and carefully machine stitched them to the carrier.

Even though the strapping is thick, the sewing machine had no difficulty stitching them in place. 

Yoga Mat Carrier by Leslie Jenison - Images 16-17

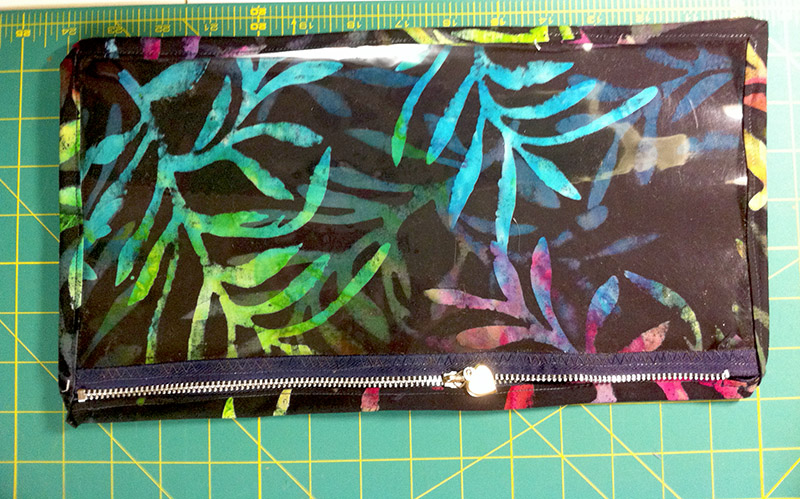
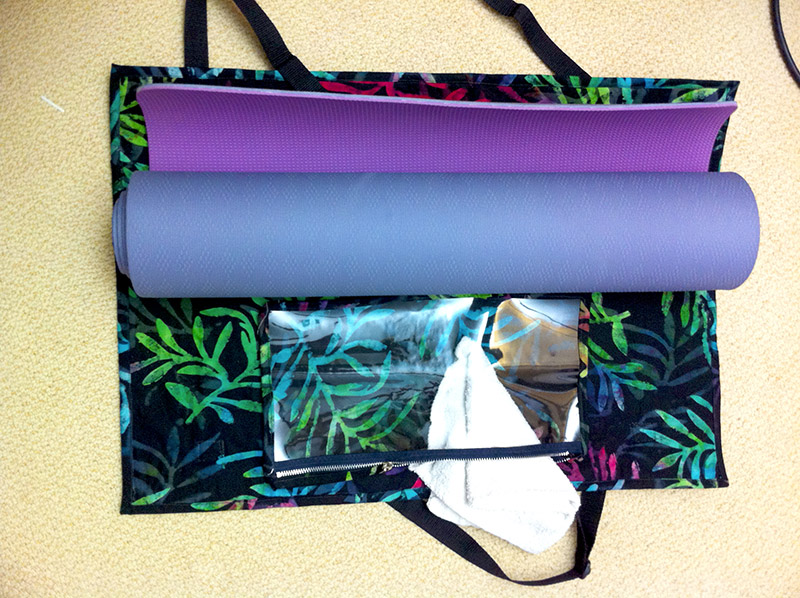
Last, I created a pouch with a clear front that will be positioned inside the carrier with two large snaps, one on each end. This adds to the functionality of the mat carrier for me, as I do not wish to carry my purse into my yoga class, yet I often need a pocket for a few small items, such as my towel and cell phone (ringer off, of course!).

Yoga Mat Carrier by Leslie Jenison - Image 18

To create this zipper bag (the finished size for mine is 7″ by 14″), I cut a piece of thick clear plastic, sold by the yard in stores with home dec materials.

I stitched to the “right” side of a zipper. Using the same type of fabric that lines the inside of my yoga carrier, I cut a length of cloth one inch wider than the width of my plastic “window”, and 1 1/2″ longer. With the right side of the cloth facing the right side of the zipper, I stitched the cloth to the zipper. Turning the plastic and zipper so it was inside-out, I stitched the sides together, taking care to stitch closely to the zipper ends. The zipper ends were carefully trimmed, along with the plastic (and I trimmed the corners to a 45 degree edge to minimize the plastic poking a hole in the cloth.

Yoga Mat Carrier by Leslie Jenison - Image 19

The bag was turned right side out. Large snaps were positioned on each top end of the bag. The male portion was attached to the bag, and the female portion positioned on the inside of the carrier and stitched in place.

Yoga Mat Carrier by Leslie Jenison - Image 20

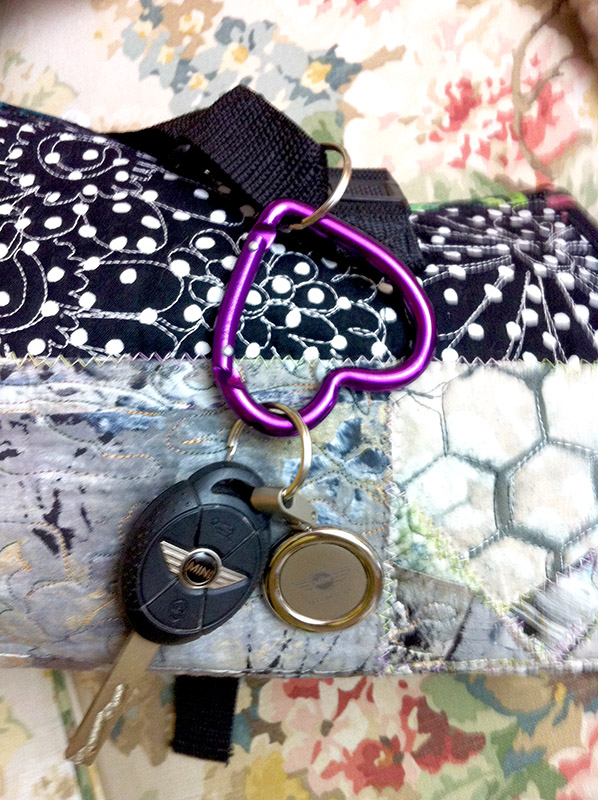
I added a whimsical but functional clip to the handle strap as a quick way to clip my car keys to the carrier. I found this clip at a home improvement center.

Yoga Mat Carrier by Leslie Jenison - Image 21


The finished carrier from the inside out is not only functional, but it’s also absolutely unique!

Yoga Mat Carrier by Leslie Jenison - Image 22

This carrier isn’t just for yoga mats – it’s also perfect for carrying a quilt to and from a show, guild meeting, or anywhere else.


Leslie Tucker Jenison headshotSan Antonio artist Leslie Tucker Jenison is inspired by the textural beauty found in the patterns of natural and man-made environments. Leslie loves the tactile experience of working with cloth and paper.  Using dye, paint, and thread, Leslie creates unique imagery on these surfaces.  The juxtaposition of the macro to microscopic world is a recurring theme in her work. Long fascinated by the historical connection of quilts and the people who make them, she serves on the board of the Alliance for American Quilts. Leslie exhibits internationally in galleries and juried exhibitions. Her work  is held in both corporate and private collections. Leslie teaches a variety of quilt and mixed media workshops. She curates exhibitions and teaches as one half of Dinner At Eight Artists along with Jamie Fingal.


Shop Havel's Now

CTA-with-9-inch-non-stick-scissors-400x325

Posted in craft, Craft to make, Guest Writers, How To, Quilting, Tutorials, Uncategorized | Tagged , , , , | 1 Comment

3 FUSED APPLIQUÉ TECHNIQUES

By Terry White

A Little Story

When I was little Girl Scout (growing up in California), our troop went to a Mexican street fair. I bought a blue flocked plaster cat bank. My name was applied with glitter on the back. I thought that it was the most beautiful thing in the world. We also had an orange tree in our backyard. These are the sources for my imagery in this quilt.


#1 FUSED APPLIQUÉ
The Leaves

Appliqué is a sewing technique by which you apply one piece of fabric to another. Over the years there have been many different types of appliqué techniques developed by ingenious stitchers. For this project, I am going to use fusible web and machine stitching.

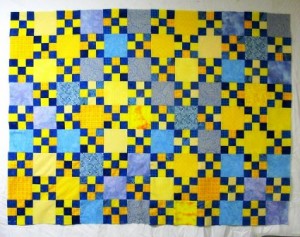
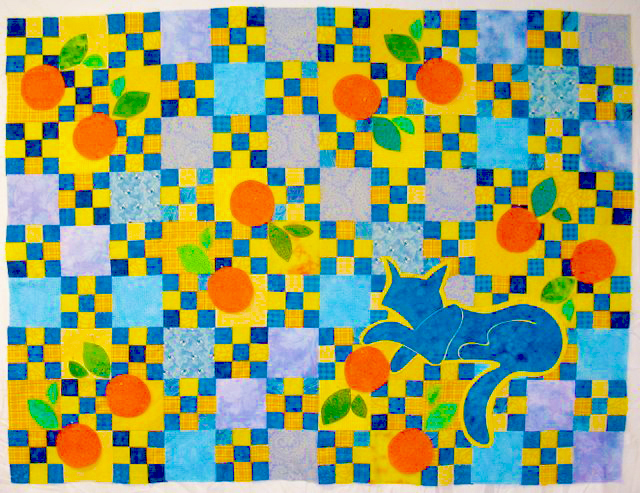
Below is a photo of the quilt in progress. The “Blue Cat” or in some instances “Jazz Cat” is one of my recurring design motifs. With the addition of the dark blue cat, I found that deeply colored oranges set off the design and the color of this quilt. The bright green leaves also add an interest of color to the design.
fused-applique-techniques-bluecat-with-oranges

Notice the positioning of each appliqué element. The oranges are offset on yellow blocks. The green leaves are positioned on adjoining yellow blocks. The blue cat is layered over a piece of yellow fabric so that he remains a separate design element. In other words, the design lines of the cat remain separate and don’t melt into the surrounding blue squares.

A very easy way to do machine appliqué is to use fusible web. There are different types of fusible web and they have different purposes. You can find this at any fabric store, just ask the sales people.

For this project, I am using a paper backed fusible web. It is very important when using this product to test it with your iron and fabric. Understand how hot your iron should be and how long the iron should be applied to the paper and fabric.

For this quilt, I’ll show three different techniques for using the fusible web. One method (the most straight forward) I will use with the leaves.

The paper on the back of the web is like tracing paper. You can see designs through it to trace with a pencil.
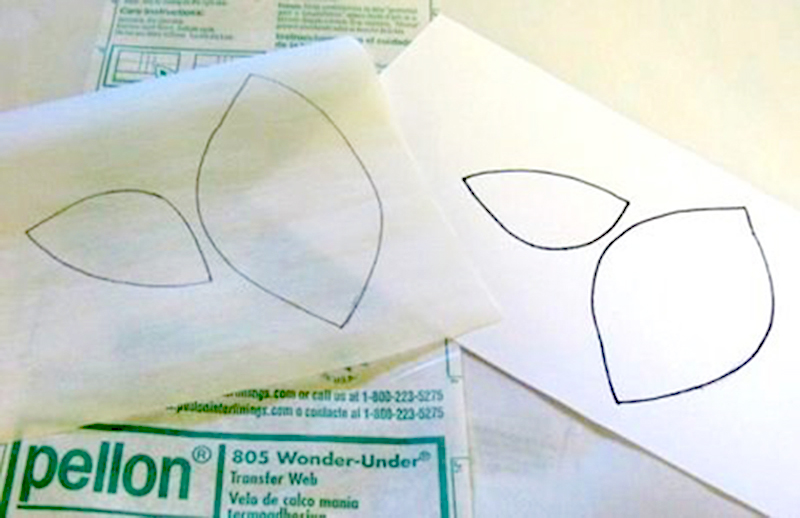
fused-applique-techniques-leaf-on-fusible-web
Trace the leaf shapes onto the paper side of the fusible web. Draw as many sets as you need. I have 12 oranges, so I traced 12 sets of leaves.

Rough cut around the leaf shapes. Iron green fabric to the glue side. I used scraps of different green fabrics. This is a scrap quilt, after all. The various green fabrics create a more lively design.

Pull a little bit of the paper backing off before cutting out the leaf shape. I call this the pre-pull. It makes it easier to pull the paper backing off once the leaf shape is cut out.
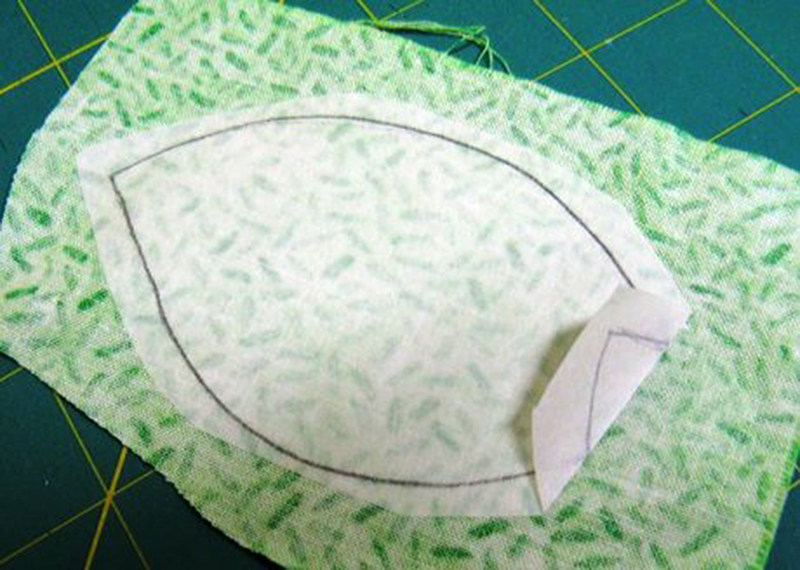
fused-applique-techniques-leaf-with-fusible-web

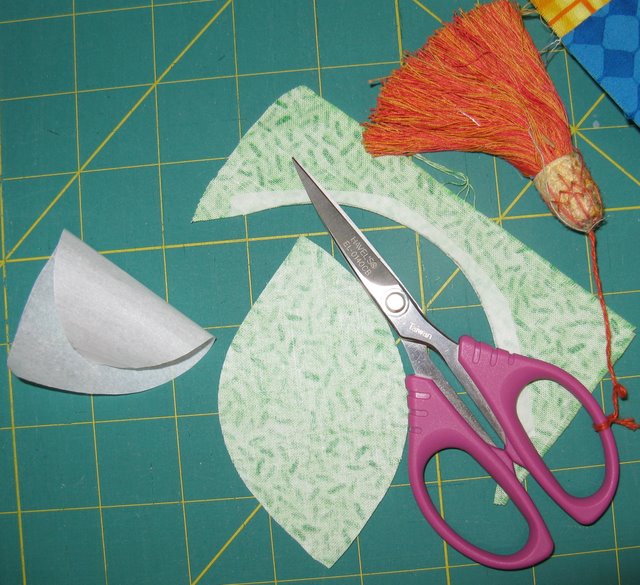
Cut out the leaf shapes. I like to use Havel’s 5 1/2″ Curved Tip Embroidery Scissors for this. You get a really nice curve to the shape when you cut.
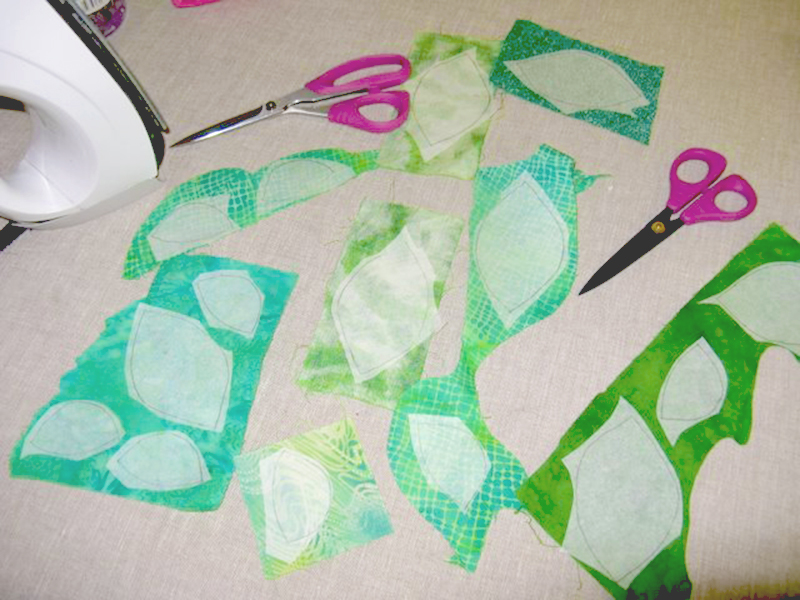
fused-applique-techniques-rough-cut-leaf-shapes

Pull the paper backing off.

6pul-lpapaer-backing 460x350

Place the leaves on the yellow squares on the quilt. Fuse the shapes according to manufacturer’s directions. The leaf shapes are ready to stitch to the quilt by machine.
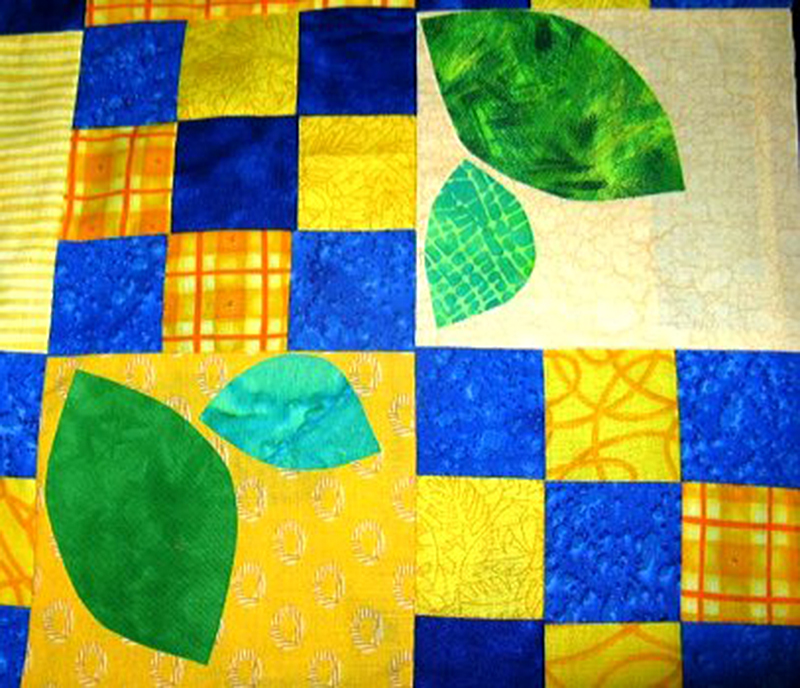
fused-applique-techniques-leaves-on-yellow-squares


#2 DOUBLE-FUSED APPLIQUÉ
& MACHINE STITCHING
The Oranges

Here is a fused appliqué technique that works when fusing over seams.

The oranges are going to be placed across the patchwork seams. If you just fuse the orange shape to the quilt, then you will see and feel the patchwork seams come through the orange. To prevent this, you can fuse the orange shape to a white fabric and then, stitch to the quilt top.

Trace the orange shape onto the paper back of the fusible web. I like the oranges to be not perfectly round. By tracing the shape, I can make each orange a little different.

Fuse the wrong side of the orange fabric to the fusible web. At this point, peel back a little of the paper backing before cutting out the orange. It will make it easier to pull the paper when the whole orange has been cut out.
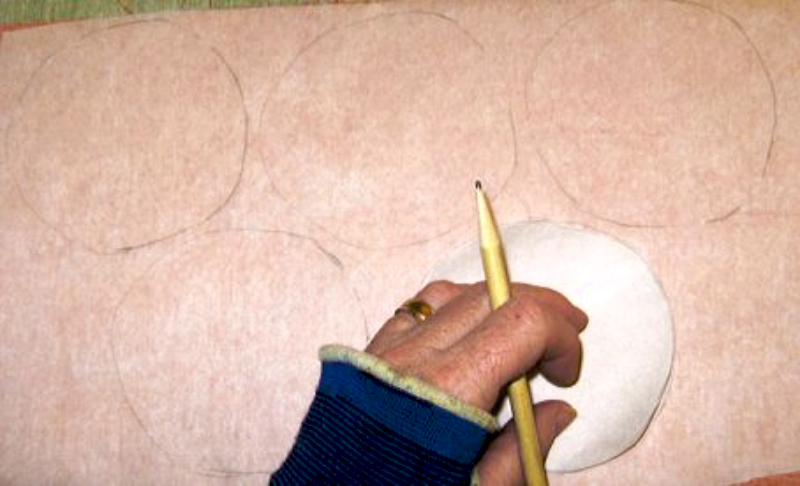
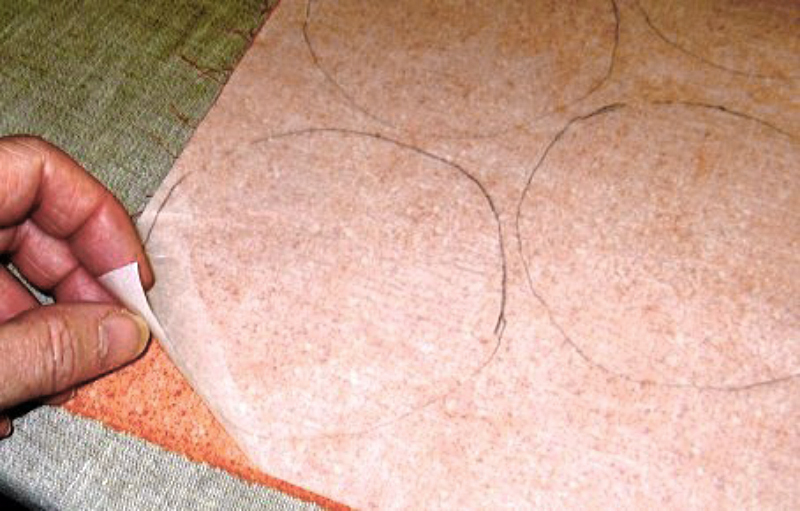
01-double-fused-applique-trace-orange-on-fusible-web


02-double-fused-applique-fuse-orange-fabric-to-fusible-web

Cut out the oranges and fuse them to white cotton fabric.
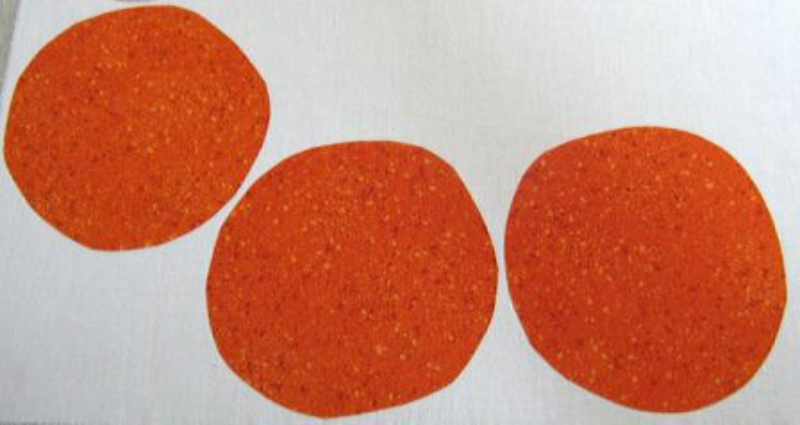
03-double-fused-applique-cut-out-oranges

Cut the oranges out of the white fabric. The orange shapes will have more body and the color of the patchwork and seams won’t show through.
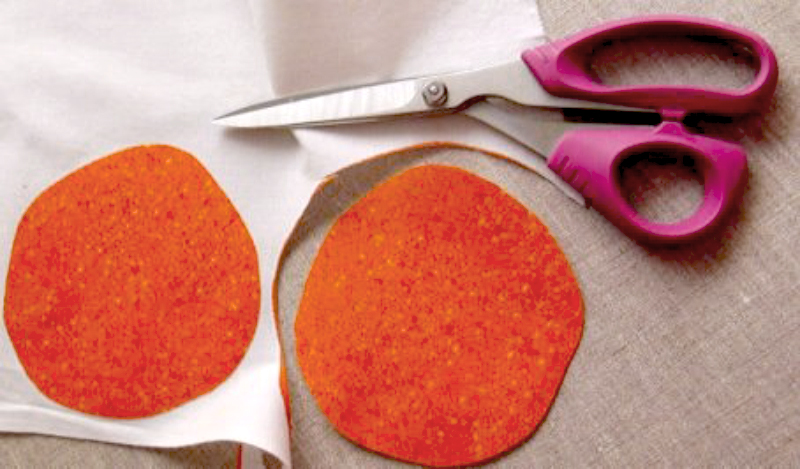
03a-double-fused-applique-cut-out-oranges

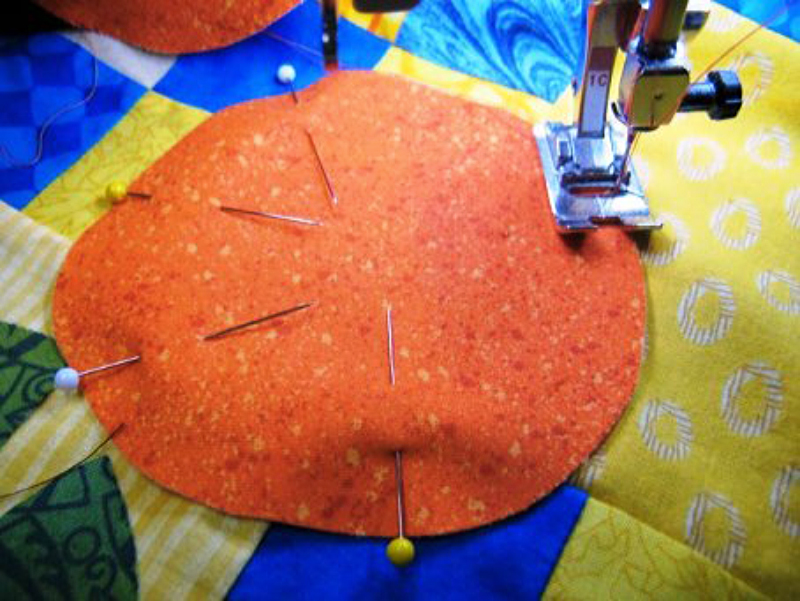
Pin the oranges in place on the quilt and they are ready for stitching. I use about five big quilt pins. Take each pin out before you get to it while you are stitching. Keep the patchwork and the orange very flat while you stitch. Notice the position of the presser foot. I use the presser foot as a guide as I stitch.
This is the stitch I used for appliqué. Notice that I positioned the stitch all the way to the right. This is so the appliqué is moved by the feed teeth.
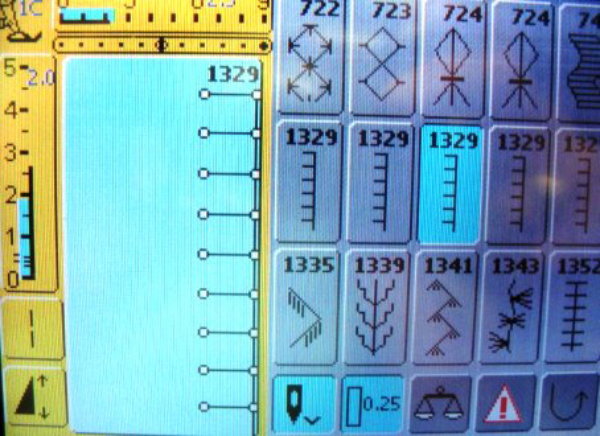
06-double-fused-applique-sewing-machine-stitch-used

The first thing is to bring the bobbin thread to the top of your work. This allows for a great first stitch. Bring the bobbin thread to the top by inserting the needle into the work once and then pulling the thread up, holding the top and bobbin thread in your hand before taking the first stitch.
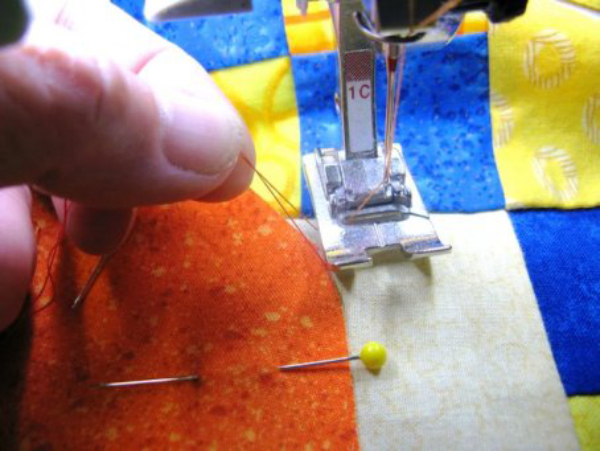
07-double-fused-applique-bring-bobbin-thread-to-top-of-work

After stitching, cut the top and the bobbin threads about two inches from the last stitch. Pull the all threads to the back of the work with a hand needle. Secure them on the back with a knot.
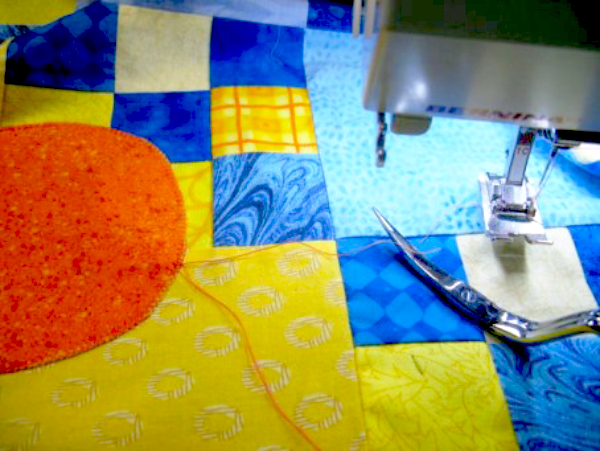
08-double-fused-applique-cut-top-and-bobbin-threads

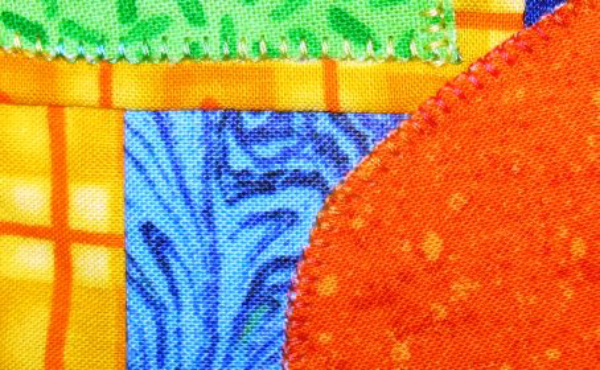
Here is a close-up of the stitching. I used variegated green and orange threads (Star Cottons) for the stitching.
09-double-fused-applique-close-up-of-stitching

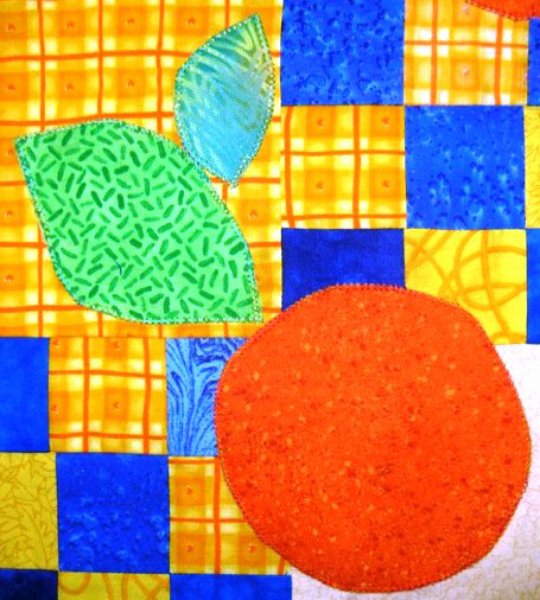
Here are the oranges and leaves on the blue and yellow quilt.
10-double-fused-applique-oranges-and-leaves-on-quilt


 #3 FUSED SHADOW APPLIQUÉ
The Blue Cat

Shadow appliqué is simply adding a background to an appliqué that is cut around the appliqué shape. It separates the shape from the quilt. In this case, it is important because the blue cat would fade right into the blue sections of the quilt. This would give an awkward shape to the cat. The yellow also accentuates the appliqué so that it has more presence in the quilt….it makes the cat shape a bigger deal.

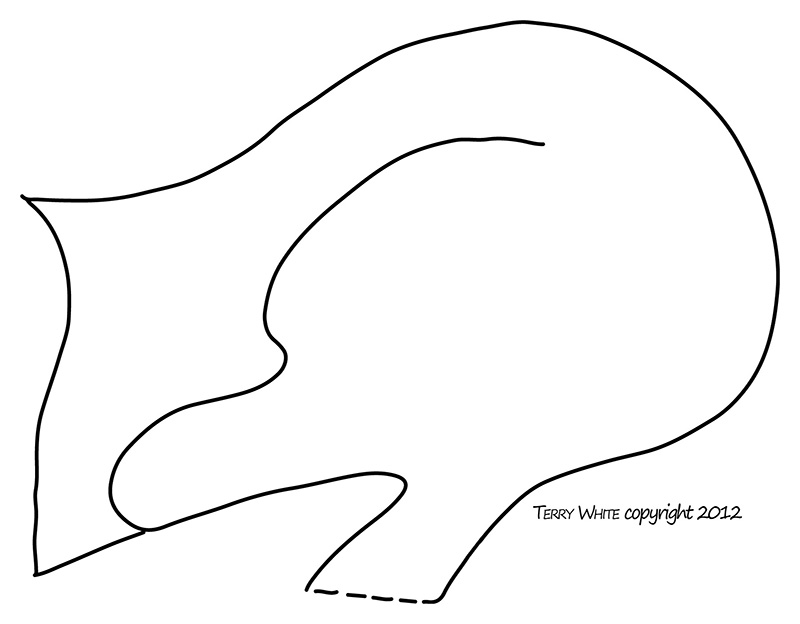
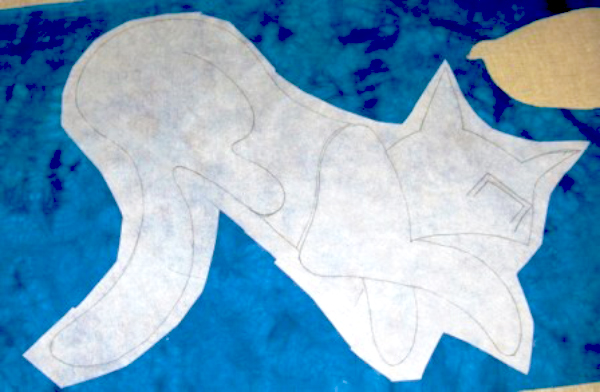
Trace the cat pattern pieces onto the fusible web. I have traced all the pattern pieces together onto the fusible web so that you can see the shapes together. Be sure to reverse the pattern so that the cat faces the left.
01-double-fused-applique-cat-outline

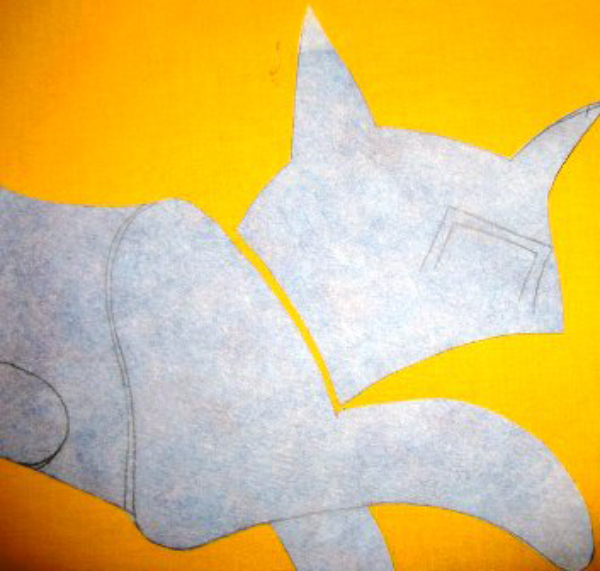
Iron the blue fabric to the web and cut out the cat. The blue fabric that I chose is a deep blue with soft texture. I think that the texture makes the cat livelier.
02-double-fused-applique-cat-outline-cut-out

Trace the cat’s face onto the blue fabric. I used a graphite marker. The graphite marker lasts forever and works on dark fabrics.
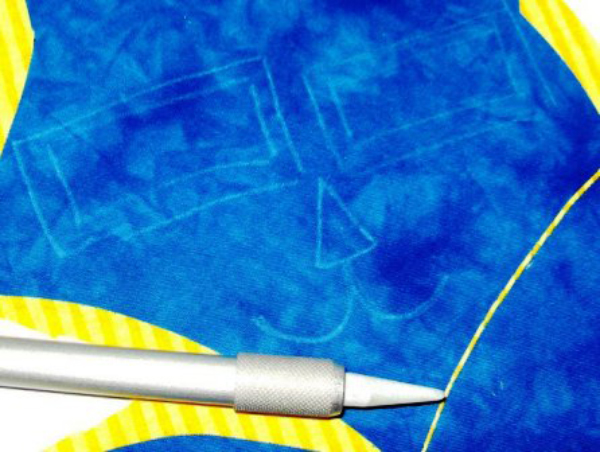
04-double-fused-applique-trace-cat-face

Fuse the blue cat to a yellow piece of fabric. The yellow stripe fabric adds a bit of humor to the cat. Rough cut the yellow fabric about half an inch around the cat shape.
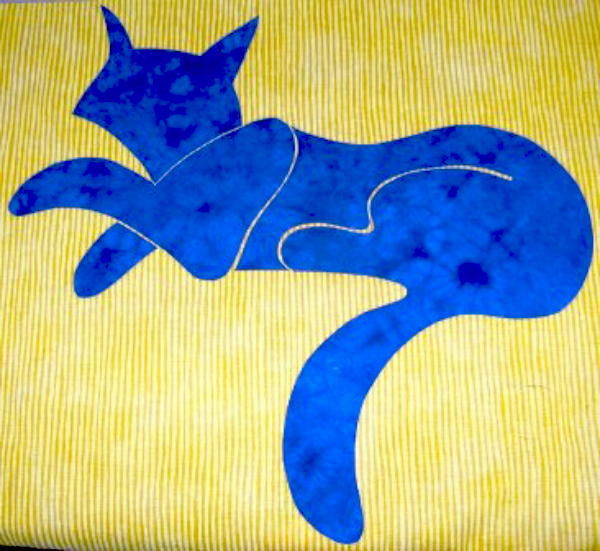
05-double-fused-applique-fuse-blue-cat-to-yellow-fabric

The yellow fabric acts as a stabilizer. Now, the cat’s face can be hand embroidered, painted, stenciled, or stitched with free motion embroidery (as I have done). I used white and fuschia STAR cotton threads to do the embroidery. Use your favorite technique for this detail work.
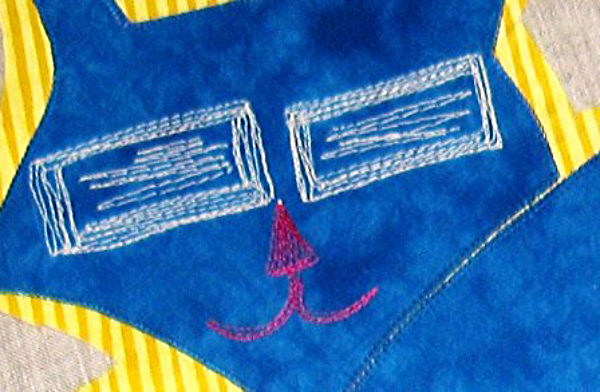
06-double-fused-applique-threadpaint-cat-face

Stitch the blue cat to the yellow fabric. Use the same stitching method as with the leaves and oranges. I used a variegated blue cotton thread to do the stitching. It blends in best with the mottled blue color fabric.
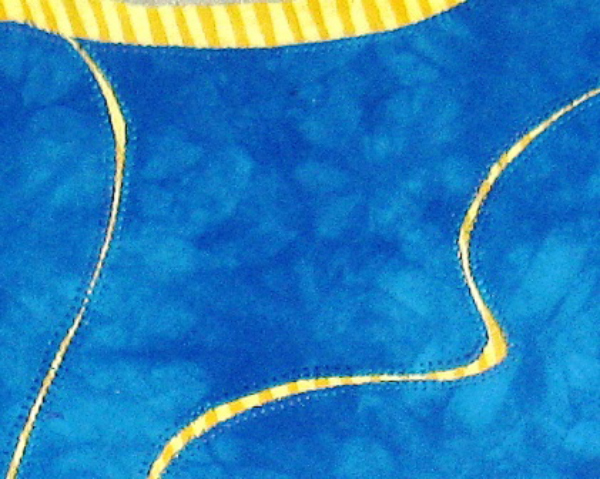
07-double-fused-applique-stitch-blue-cat-to-yellow-fabric

Trim the yellow fabric to create the cat’s shadow. At this point, after embroidering the face, I pressed the appliqué. Then, I carefully trimmed the yellow shadow to make a nice smooth shape. Notice that the yellow shadow is thin in some spots and thicker in others. This was done to make a pleasing silhouette.
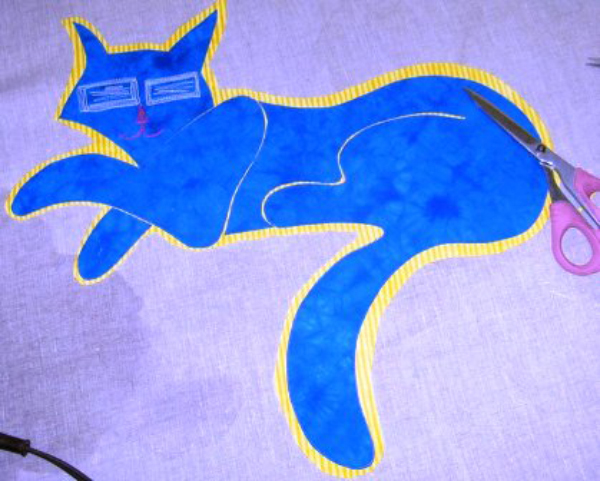
08-double-fused-applique-trim-yellow-fabric-to-create-shadow

Pin the cat appliqué in place and stitch as with the oranges and leaves. I used a bright yellow variegated cotton thread to stitch the cat to the quilt top.
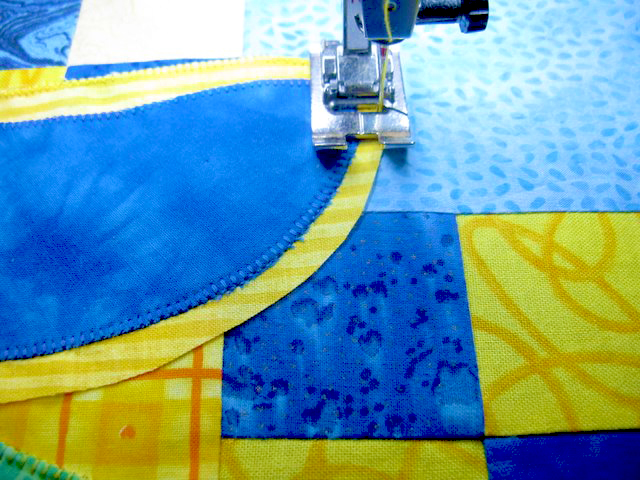
09-double-fused-applique-pin-cat-and-stitch-in-place

Sometimes, people like to cut the pieced fabric from beneath the appliqué shapes. It does make it easier to quilt. In this case, I chose to keep the pieced top intact. This will be a picnic quilt that will be well used and I want to keep the integrity of the patchwork intact for strength.

Below is the blue cat stitched to the finished quilt top. The blue cat looks very happy among the oranges on this picnic quilt.
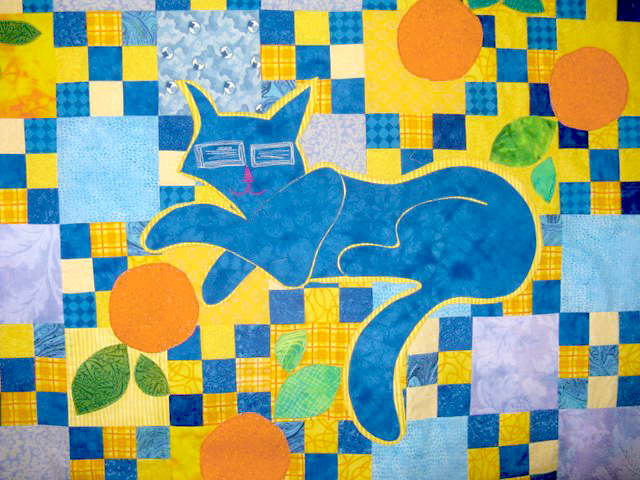
10-double-fused-applique-finished-blue-cat-applique-quilt


BLUE CAT WITH ORANGES PATTERNS


11-double-fused-applique-cat-pattern-image-01_659x800


11-double-fused-applique-cat-pattern-image-02_610x800


11-double-fused-applique-cat-pattern-image-03_800x624


terry-white-headshot-2014Terry White is a studio fiber artist. She has been doing this work since 1996, and she discovered the techniques she uses: threadpaint, machine appliqué, piece, quilt, embellish with beads, fibers and minutiae with sewing machine techniques, through experimentation and self-study.  Terry teaches these techniques through classes and videos.  Over the years Terry has been published in over 50 articles in magazines and books, including: McCall’s Needlework; Quilter’s Newsletter; Machine Embroidery and Textile Arts; CMA trade magazine; Stitch n Sew Quilts; Quick n Easy Quilts; Quilt World magazine and Calendar; Quilting Arts Calendar 2003; America from the Heart; America’s Best; America Sews.  She is a wife, stitcher, artist, sister, mother, friend, nana, gardener, baker, writer, student, teacher and American.  See more of Terry’s work at www.threadpaint.com.


scissors-tray_terry-white-cta


Posted in Applique, Fuse Shadow Applique, Fused Applique, Guest Writers, How To, Quilting, Terry White, Tutorials, Uncategorized | Tagged , , , , , | Comments Off on 3 FUSED APPLIQUÉ TECHNIQUES

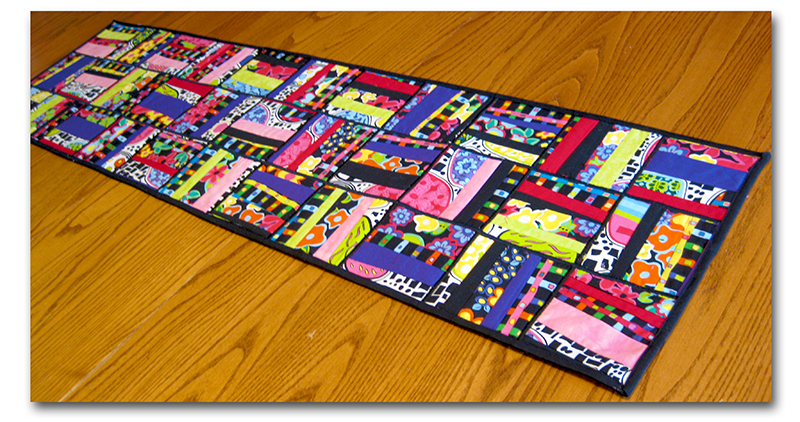
Make An Incredibly Easy Table Runner

By Liz Kettle

This design can easily be adapted to other sizes such as a placemat, or smaller table mats to put under
a special bowl or plant.

I have to admit that I have never had any interest in the quilt as you go technique. It simply didn’t appeal to me…maybe because I tend to be a very linear girl. You know, step 1, then step 2, everything in order. It just seemed strange to hop from step 1 to step 10 and then back to step 1 again. But, when I wanted to make some quick table runners for gifts, I started re-thinking the quilt as you go method, and the ‘what if’ wheels started turning.

Incredibly Easy Table Runner, by Liz Kettle

I have to tell you right from the start that these are very addicting…good thing they are fast! I have 3 in various stages of production and at least 5 other color and fabric combinations are dancing like sugar plums in my head. As a bonus this design can easily be made into other sizes such as a placemat or smaller table mats to put under a special bowl or plant. You can even make them square!

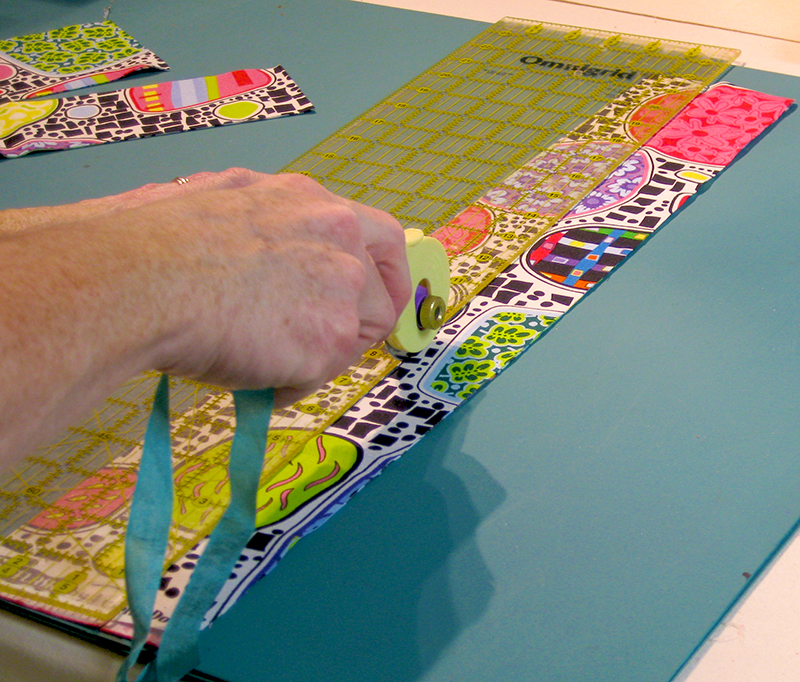
I use two different types of rotary cutters in this project. When I am cutting fabric strips I love the 45mm Comfort Rotary Cutter. The cushion handle and the curve of the handle help keep my arm and wrist at a comfortable angle for cutting. Having the right angle prevents wrist fatigue so I can cut longer. I also use the 60mm Jumbo Rotary Cutter because it makes cutting through the thick quilt sandwich super easy without applying a lot of pressure and it gives me a really great straight cut, even when cutting across multiple seams.

Supplies:

  • Rotary cutters, fabric ruler and cutting mat
  • Fabric-top; 5-10 that coordinate. Less than a fat quarter of each. This is a great project to use up scraps.
  • Fabric-backing: A piece at least 1/2” larger on each side than your desired finished size.
  • Batting: any batting the size of your backing fabric.
  • Thread: cotton piecing thread and thread for the satin stitch (medium to heavy weight).
  • Quilting machine needle 90/14

Step 1: Cut your back fabric and batting slightly larger (1/2”-1”) than your desired finished size. This project is adaptable to many sizes. I decided I wanted my blocks to be 4” and my runner 12”x44”. Keeping the finished size divisible by 4 makes the math simple. You can work with smaller blocks or larger blocks but plan the final size of your runner to be evenly divisible by the block size. For example a 3″ block size would make a 9″x12″ placemat. Layer the back fabric and batting then set aside.

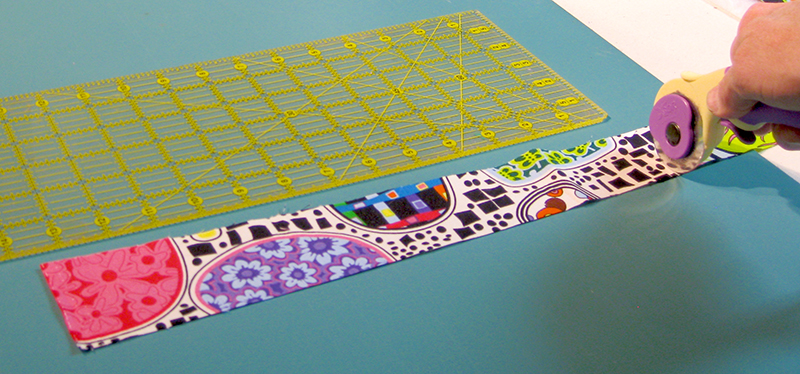
Step 2: Gather your top fabrics. Using your rotary cutter, ruler and mat, cut strips from your fabric in a variety of widths. My smallest strip is 1 ½” and my widest is 3 ½” I cut my solids smaller than my prints. Cut each strip a little longer than the width of your runner. For a 12” wide runner cut strips 13”-14” long. The ends do not have to be straight.

using-rotary-cutter-cut-strips-from-fabric-in-various-widths

Step 3: Next you will cut each strip in half at an angle…all different angles but not too extreme. Notice the angle in the photo above. Lay each piece on top of the runner base to help determine when you have enough strips as in the photo below.

cut-strip-in-half-at-various-angles

lay-each-piece-on-top-of-runner-base

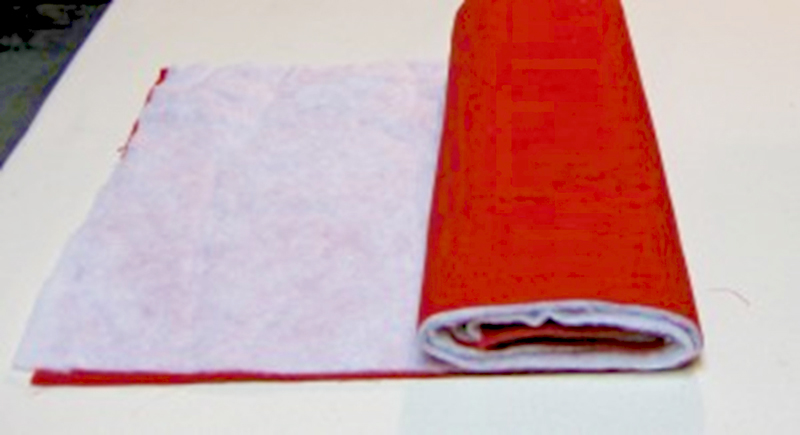
Step 4: Roll your backing/batting layer like a jelly roll to make it easier to stitch. Take your strips and your jelly rolled backing to your machine. I suggest a 90/14 quilting needle since we are quilting and piecing in one step.

roll-backing-batting-layer-like-jelly-roll

Step 5: Choose two strips of fabric to begin with. Place them rights sides together along the left side of your backing fabric. Stitch along the right edge with a ¼” seam allowance. Remember, your bobbin thread will be the quilting thread that shows on the backing fabric. You can match the color or use a contrasting color for interest.

place-two-strips-of-fabric-right-sides-together

Step 6: Finger press the seam flat. Place the next strip of fabric down on the edge and stitch with a ¼” seam allowance. Alternate the angle of the strips as you go, i.e.: narrow at the top is followed by wide at the top.

finger-press-seams-flat

Step 7: Continue adding strips of fabric until you reach the end of your backing fabric.

continue-adding-fabric-strips-until-end-of-backing-fabric

Step 8: Press with a hot iron after every 6-8 strips.

press-with-hot-iron-every-6-8-strips

Tip: The one difficulty in this project is the bias edges created by cutting the fabric strips on an angle. You can see in the photo below where the red strip has become curved because it stretched while stitching. To rectify this problem the next strip is placed at a straight angle to the red piece rather than matching up the edges before stitching. Stitch along the edge of the top piece. After this is pressed open, you once again have a straight edge. Be careful to not stretch the fabrics as you stitch.

bias-edge-difficulty-created-by-cutting-fabric-strips-on-angle

At this point your runner will look like this.
at-this-point-your-runner-will-look-like-this

Step 9: Use the 60mm rotary cutter to trim the runner to the desired finished size (12”x44” in this case).

Use the 60mm rotary cutter to trim the runner to the desired finished size (12”x44” in this case).

Step 10: Turn the runner over and cut strips the desired width of your blocks. 4” width in this case.

Turn the runner over and cut strips the desired width of your blocks. 4” width in this case.

Step 11: Then cut each strip into blocks your desired size. 4” blocks in this case.

Then cut each strip into blocks your desired size. 4” blocks in this case.

Step 12: Lay out the blocks the width and length of your runner, alternating the direction of stripes in a checkerboard pattern.

Lay out the blocks the width and length of your runner, alternating the direction of stripes in a checkerboard pattern.

Step 13: To assemble the blocks we will use a serpentine stitch. Butt the edges of two blocks together and stitch. The serpentine stitch is a three step zigzag stitch used for stitching knit fabrics. The three separate stitches make it great for joining two fabric sandwiches.

To assemble the blocks we will use a serpentine stitch. The serpentine stitch is a three step zigzag stitch used for stitching knit fabrics.

To assemble the blocks we will use a serpentine stitch. Butt the edges of two blocks together and stitch.

Sept 14: Assemble the blocks in strips of 3 taking care to keep the pattern alternating.

Assemble the blocks in strips of 3 taking care to keep the pattern alternating.

Step 15: Then, join the strips of three together.

Then, join the strips of three together.

Step 16: After all the blocks are reassembled into your table runner, press with a hot iron. Next cover each butted seam with a satin stitch. If Possible, use an embroidery foot that has extra space on the bottom of the foot for the thick satin stitches.

Next cover each butted seam with a satin stitch.

Tips for Satin Stitching:

  • If possible use a medium to heavy weight thread (medium wt.= 40-30wt. heavy wt.=25-12wt). A fine thread such as a 50 wt. will not fill in as nicely and you may have to re-stitch some of the lines.
  • At the beginning of each stitch line hold the thread tails to prevent the top thread from getting stitched underneath and to help prevent thread build up at the edges of the satin stitch.
  • A solid thread generally looks best for this technique because variegated colored threads often look like stripes when stitched in a satin stitch. Stripes can be fun depending on the look you want but they can be distracting to the overall pattern. The one exception I have found is the Star Variegated threads that are designed by Terry White. The color change in these threads is generally very subtle and you can see an example in the last photo of this tutorial.

Step 17: Press well with a hot iron and finish the edges as desired. I used a traditional binding on mine. There are a lot of binding tutorials on the Internet if you need further details. Heather Bailey has a great one. A satin stitched edge would also look nice. If you choose to finish with a satin stitch edge use a stabilizer to keep the edge from stretching and rippling. Cut strips of tear away or water soluble stabilizer 2” wide and center the runner edge over the stabilizer. Stitch the edge then remove the stabilizer.

This runner looks great in a wide variety of fabrics from elegant silks to earthy batiks.

This runner looks great in a wide variety of fabrics from
elegant silks to earthy batiks.

I hope you have as much fun making them, as I do!


Liz Kettle, Fiber ArtistLiz Kettle is a textile and mixed-media artist who loves sewing and creating with fabric and thread. Sharing sewing joy and thread addiction with others makes her deliriously happy. Liz is co-author of two best selling books: Fabric Embellishing: The Basics and Beyond and Threads: The Basics and Beyond.  Share Liz’s stitch journey on her website and blog at www.TextileEvolution.com.


Shop Havel's Now


Posted in For Beginners in Sewing, Free Craft Projects, Free Quilt Projects, Free Sewing Project, Guest Writers, How to Quilt, Liz Kettle, Quilting, Quilting, Table Runner, Uncategorized | Tagged , , , | 1 Comment

Mixed Media Quilt Project: Scrappy Spider Web

By Terry White

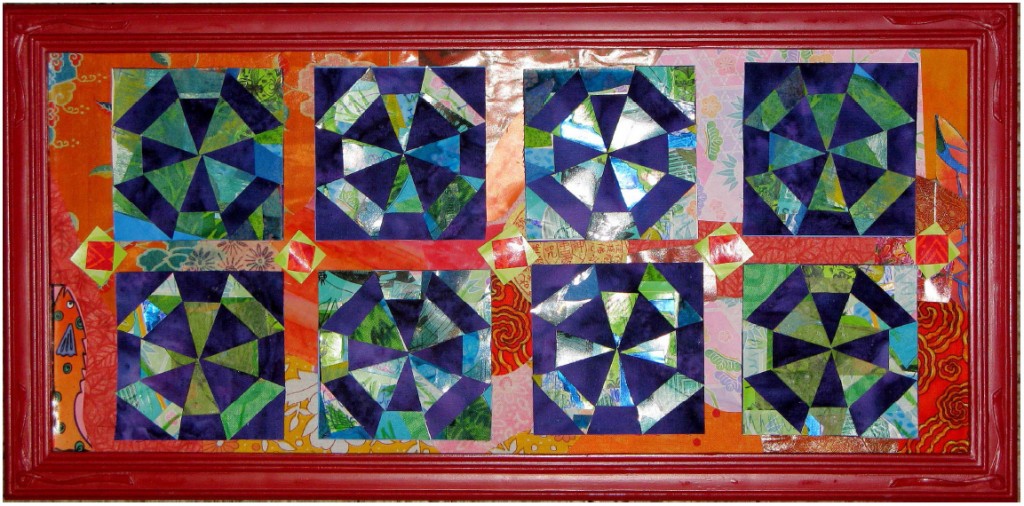
Using bits of tissue paper, packaging, wrapping paper, travel brochures, stickers and sticker waste, magazine rips, junk mail, catalogs, postcards, and a flea market frame, create this truly unique upcycle project.

miniature-quilt-design-scrappy-spider-web-by-terry-white

You Will Need:

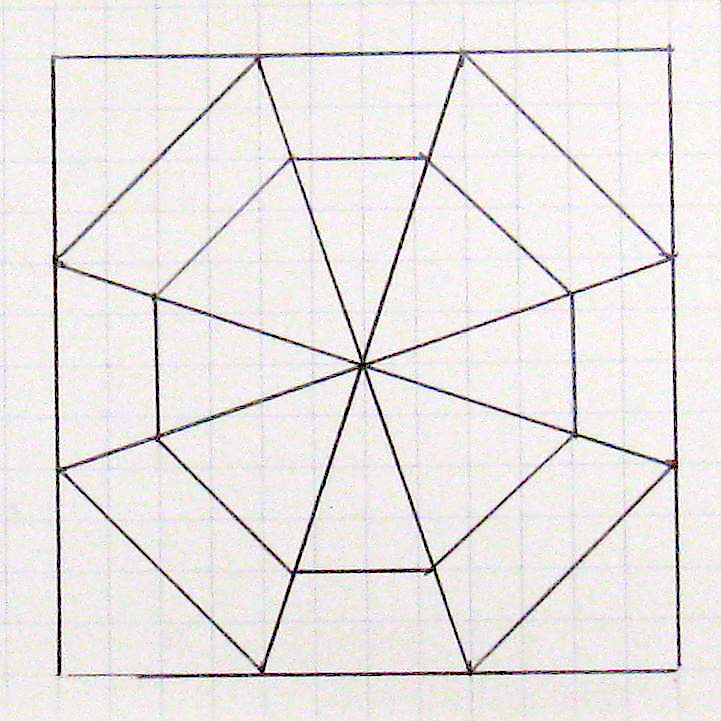
  • 1/4″ graph paper to draft the design to complete a 3″ square (or copy and use the pattern provided).
  • Cereal box cardboard or cardstock for two scrap sheets, you will be making four 3″ squares out of the blue scrap sheet (each square makes two blocks). The yellow scrap sheet will be the background for the quilt and it should fit in your frame.
  • Scraps as described above. Enough to cover the two scrap sheets. Two sets of color were used in this project: blue/green and orange/yellow.
  • Fabrick contrasting to the blue/green – I used dark purple
  • Several sheets of copy paper
  • Glue
  • Marking tools – pen or pencil
  • Crayons, paints, color pencils and markers to add exra design, color and texture
  • Havel’s 60mm Jumbo Rotary Cutter, cutting mat and fabric ruler
  • Havel’s Non-Stick 9″ inch scissors
  • Flea market frame

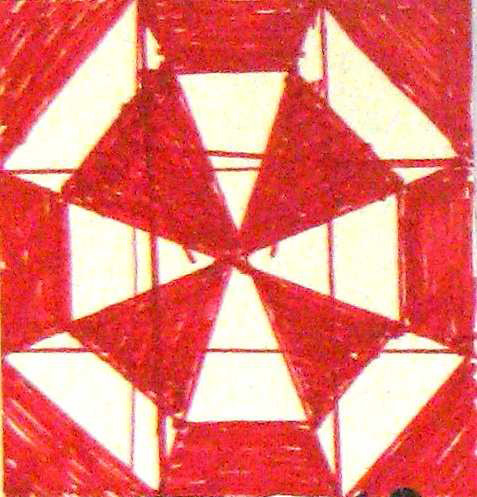
Draft a 3″ Spider Web quilt block using 1/4″ graph paper. Make several copies on regular copy paper.

draft-3-inch-spider-web-quilt-block

Shade one of the copies to make a two-color block. Use this as your guide for making pieces and the arrangement of blocks.

shade-one-copy-to-make-two-color-block

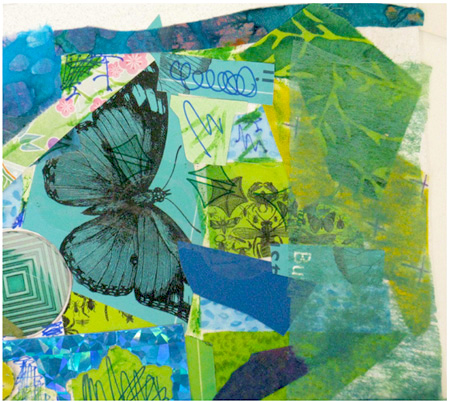
Make blue and green scrap sheet. Use the cardstock as a base. Layer big scrap pieces and glue to sheet. Ad smaller pieces on top and add marks of color if desired. Press with a heavy book and let dry overnight.

make-blue-and-green-scrap-sheet

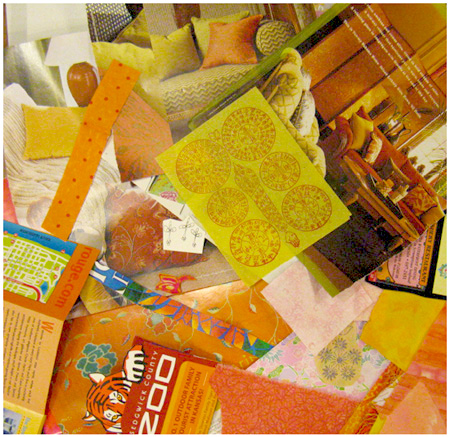
Make scrap sheet of yellow and orange pieces. This will be your background.
Glue big scraps down and glue to card stock. Press with a heavy book and let dry overnight.

make-scrap-sheet-of-yellow-and-orange-pieces

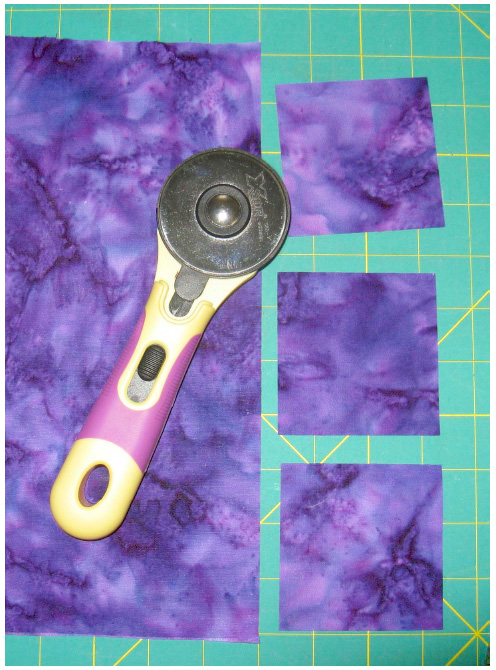
Cut 3″ fabric squares from a highly contrasting fabric. This is a dark purple hand dyed fabric.The hand dye adds extra texture to the design.

I use Havel’s Jumbo Rotary Cutter because it has a long lasting blade of
Japanese steel (I use this a lot!) and the ergonomic soft handle is easy on my hands.
Glue the fabric to a 3″ square of copy paper. This adds stability to the fabric.

cut-3-inch-fabric-squares-from-contrasting-fabric

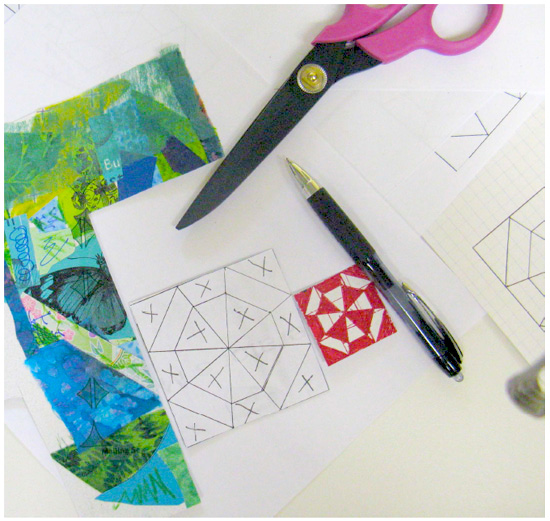
Cut out and glue a copy of the spider web block to the back of blue/green scrap sheet. Cut out square. Make X marks to correspond with shaded pieces of quilt block design.

make-x-marks-to-correspond-to-shaded-pieces

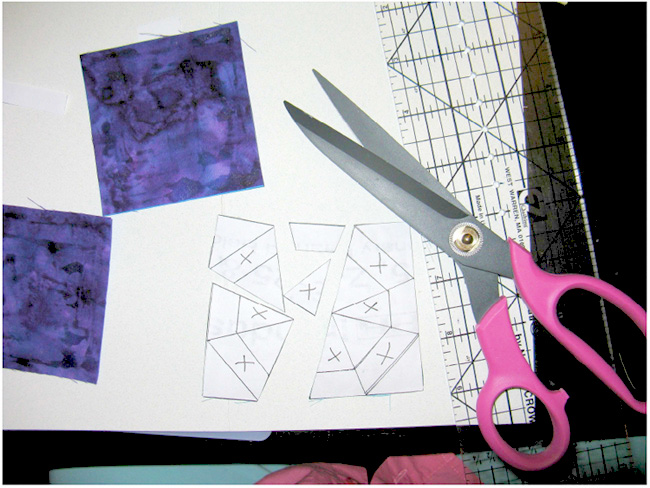
Cut out the pieces with Havel’s Non-Stick Scissors. They are coated stainless steel, and isn’t that smart? The size makes it easy to cut through thick layers. The non-stick coating makes it easy to cut through sticky adhesive, paint, wax from crayons and layers of paper. The blades are serrated for a nice grip on various materials.

cut-out-the-pieces-with-not-stick-scissors

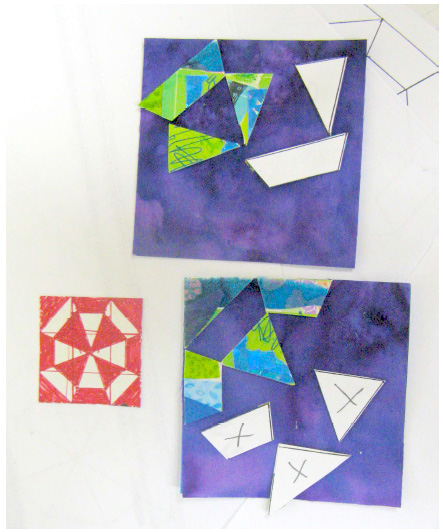
Arrange and glue the X marked pieces on one purple square.
Arrange and glue the unmarked pieces on the other purple square.

arrange-and-glue-x-marked-pieces-on-purple-square

Arrange and glue the quilt blocks onto the yellow scrap sheet. At this point make additions like corner squares and smaller scraps to add decoration. I cut the fish image from an ad in a travel brochure.

Press with heavy books – frame with flea market frame.

arrange-and-glue-quilt-blocks-frame-with-frame

Watch Terry’s instructional video for “Scrappy Spider Web”, below.


terry-white-threadpaint-artist-author

Terry White is a studio fiber artist. She has been doing this work since 1996, and she discovered the techniques she uses: threadpaint, machine appliqué, piece, quilt, embellish with beads, fibers and minutiae with sewing machine techniques, through experimentation and self-study.  Terry teaches these techniques through classes and videos.  Over the years Terry has been published in over 50 articles in magazines and books, including: McCall’s Needlework; Quilter’s Newsletter; Machine Embroidery and Textile Arts; CMA trade magazine; Stitch n Sew Quilts; Quick n Easy Quilts; Quilt World magazine and Calendar; Quilting Arts Calendar 2003; America from the Heart; America’s Best; America Sews.  She is a wife, stitcher, artist, sister, mother, friend, nana, gardener, baker, writer, student, teacher and American.  See more of Terry’s work at www.threadpaint.com.

9-inch-non-stick-scissors-cta-terry-white

Posted in art ideas, craft, Craft to make, Free Craft Projects, Free Quilt Projects, Fun Stuff, Guest Writers, Mixed Media, Terry White, Wall Hangings | Tagged , , , , | Comments Off on Mixed Media Quilt Project: Scrappy Spider Web

Mixed Media Quilt Project: Scrappy Spider Web

By Terry White

Using bits of tissue paper, packaging, wrapping paper, travel brochures, stickers and sticker waste, magazine rips, junk mail, catalogs, postcards, and a flea market frame, create this truly unique upcycle project.

miniature-quilt-design-scrappy-spider-web-by-terry-white

You Will Need:

  • 1/4″ graph paper to draft the design to complete a 3″ square (or copy and use the pattern provided).
  • Cereal box cardboard or cardstock for two scrap sheets, you will be making four 3″ squares out of the blue scrap sheet (each square makes two blocks). The yellow scrap sheet will be the background for the quilt and it should fit in your frame.
  • Scraps as described above. Enough to cover the two scrap sheets. Two sets of color were used in this project: blue/green and orange/yellow.
  • Fabrick contrasting to the blue/green – I used dark purple
  • Several sheets of copy paper
  • Glue
  • Marking tools – pen or pencil
  • Crayons, paints, color pencils and markers to add exra design, color and texture
  • Havel’s 60mm Jumbo Rotary Cutter, cutting mat and fabric ruler
  • Havel’s Non-Stick 9″ inch scissors
  • Flea market frame

Draft a 3″ Spider Web quilt block using 1/4″ graph paper. Make several copies on regular copy paper.

draft-3-inch-spider-web-quilt-block

Shade one of the copies to make a two-color block. Use this as your guide for making pieces and the arrangement of blocks.

shade-one-copy-to-make-two-color-block

Make blue and green scrap sheet. Use the cardstock as a base. Layer big scrap pieces and glue to sheet. Ad smaller pieces on top and add marks of color if desired. Press with a heavy book and let dry overnight.

make-blue-and-green-scrap-sheet

Make scrap sheet of yellow and orange pieces. This will be your background.
Glue big scraps down and glue to card stock. Press with a heavy book and let dry overnight.

make-scrap-sheet-of-yellow-and-orange-pieces

Cut 3″ fabric squares from a highly contrasting fabric. This is a dark purple hand dyed fabric.The hand dye adds extra texture to the design.

I use Havel’s Jumbo Rotary Cutter because it has a long lasting blade of
Japanese steel (I use this a lot!) and the ergonomic soft handle is easy on my hands.
Glue the fabric to a 3″ square of copy paper. This adds stability to the fabric.

cut-3-inch-fabric-squares-from-contrasting-fabric

Cut out and glue a copy of the spider web block to the back of blue/green scrap sheet. Cut out square. Make X marks to correspond with shaded pieces of quilt block design.

make-x-marks-to-correspond-to-shaded-pieces

Cut out the pieces with Havel’s Non-Stick Scissors. They are coated stainless steel, and isn’t that smart? The size makes it easy to cut through thick layers. The non-stick coating makes it easy to cut through sticky adhesive, paint, wax from crayons and layers of paper. The blades are serrated for a nice grip on various materials.

cut-out-the-pieces-with-not-stick-scissors

Arrange and glue the X marked pieces on one purple square.
Arrange and glue the unmarked pieces on the other purple square.

arrange-and-glue-x-marked-pieces-on-purple-square

Arrange and glue the quilt blocks onto the yellow scrap sheet. At this point make additions like corner squares and smaller scraps to add decoration. I cut the fish image from an ad in a travel brochure.

Press with heavy books – frame with flea market frame.

arrange-and-glue-quilt-blocks-frame-with-frame

Watch Terry’s instructional video for “Scrappy Spider Web”, below.


terry-white-threadpaint-artist-author

Terry White is a studio fiber artist. She has been doing this work since 1996, and she discovered the techniques she uses: threadpaint, machine appliqué, piece, quilt, embellish with beads, fibers and minutiae with sewing machine techniques, through experimentation and self-study.  Terry teaches these techniques through classes and videos.  Over the years Terry has been published in over 50 articles in magazines and books, including: McCall’s Needlework; Quilter’s Newsletter; Machine Embroidery and Textile Arts; CMA trade magazine; Stitch n Sew Quilts; Quick n Easy Quilts; Quilt World magazine and Calendar; Quilting Arts Calendar 2003; America from the Heart; America’s Best; America Sews.  She is a wife, stitcher, artist, sister, mother, friend, nana, gardener, baker, writer, student, teacher and American.  See more of Terry’s work at www.threadpaint.com.


9-inch-non-stick-scissors-cta-terry-white


Posted in Fabric, Fabric Scissors, Free Quilt Projects, Fun Stuff, Guest Writers, New Products, Patterns, Reviews, Terry White, Tutorials, Uncategorized, Wall Hangings | Tagged , , , , , | 61 Comments