Incredibly Easy Table Runner 
I have to admit that I have never had any interest in the quilt as you go technique. It simply didn’t appeal to me…maybe because I tend be a very linear girl. You know, step, 1 then step 2, everything in order. It just seemed strange to hop from step 1 to step 10 and then back to step 1 again. But, when I wanted to make some quick table runners for gifts I started re-thinking the quilt as you go method and the ‘what if’ wheels started turning.
I have to tell you right from the start that these are very addicting…good thing they are fast! I have 3 in various stages of production and at least 5 other color and fabric combinations are dancing like sugar plums in my head. As a bonus this design can easily be made into other sizes such as a placemat or smaller table mats to put under a special bowl or plant. You can even make them square.
I use two different types of rotary cutters in this project. When I am cutting fabric strips I love the 45mm Comfort Rotary Cutter. The cushion handle and the curve of the handle help keep my arm and wrist at a comfortable angle for cutting. Having the right angle prevents wrist fatigue so I can cut longer. I also use the 60mm Jumbo Rotary Cutter because it makes cutting through the thick quilt sandwich super easy without applying a lot of pressure and it gives me a really great straight cut, even when cutting across multiple seams.
Supplies:
• Rotary cutters, ruler and mat
• Fabric-top; 5-10 that coordinate. Less than a fat quarter of each. This is a great project to use up scraps.
• Fabric-backing: A piece at least 1/2” larger on each side than your desired finished size.
• Batting: any batting the size of your backing fabric.
• Thread: cotton piecing thread and thread for the satin stitch (medium to heavy weight)
• Quilting machine needle 90/14
Step 1: Cut your back fabric and batting slightly larger (1/2”-1”) than your desired finished size. This project is adaptable to many sizes. I decided I wanted my blocks to be 4” and my runner 12”x44”. Keeping the finished size divisible by 4 makes the math simple. You can work with smaller blocks or larger blocks but plan the final size of your runner to be evenly divisible by the block size. For example a 3″ block size would make a 9″x12″ placemat. Layer the back fabric and batting then set aside.
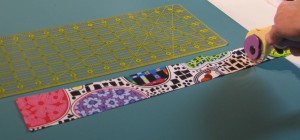
Step 2: Gather your top fabrics. Using your rotary cutter, ruler and mat cut strips from your fabric in a variety of widths. My smallest strip is 1 ½” and my widest is 3 ½” I cut my solids smaller than my prints. Cut each strip a little longer than the width of your runner. For a 12” wide runner cut strips 13”-14” long. The ends do not have to be straight.
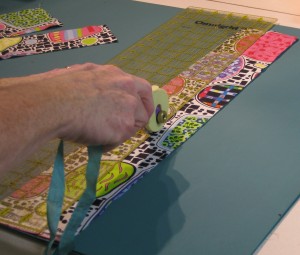
Step 3: Next you will cut each strip in half at an angle…all different angles but not too extreme. Notice the angle in the photo above. Lay each piece on top of the runner base to help determine when you have enough strips as in the photo below.


Step 4: Roll your backing/batting layer like a jelly roll to make it easier to stitch. Take your strips and your jelly rolled backing to your machine. I suggest a 90/14 quilting needle since we are quilting and piecing in one step.

Step 5: Choose two strips of fabric to begin with. Place them rights sides together along the left side of your backing fabric. Stitch along the right edge with a ¼” seam allowance. Remember, your bobbin thread will be the quilting thread that shows on the backing fabric. You can match the color or use a contrasting color for interest.

Step 6: Finger press the seam flat. Place the next strip of fabric down on the edge and stitch with a ¼” seam allowance. Alternate the angle of the strips as you go, ie: narrow at the top is followed by wide at the top.

Step 7: Continue adding strips of fabric until you reach the end of your backing fabric.

Step 8: Press with a hot iron after every 6-8 strips


Tip: The one difficulty in this project is the bias edges created by cutting the fabric strips on an angle. You can see in this photo where the red strip has become curved because it stretched while stitching. To rectify this problem the next strip is placed at a straight angle to the red piece rather than matching up the edges before stitching. Stitch along the edge of the top piece. After this is pressed open you once again have a straight edge. Be careful to not stretch the fabrics as you stitch.

At this point your runner will look like this.
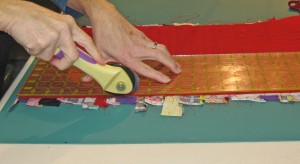
Step 9: Use the 60mm rotary cutter to trim the runner to the desired finished size (12”x44” in this case).
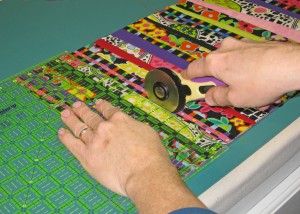
Step 10: Turn the runner over and cut strips the desired width of your blocks. 4” width in this case.
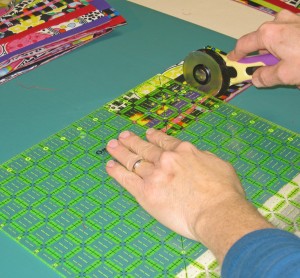
Step 11: Then cut each strip into blocks your desired size. 4” blocks in this case.

Step 12: Lay out the blocks the width and length of your runner, alternating the direction of stripes in a checkerboard pattern.

serpentine stitch

Step 13: To assemble the blocks we will use a serpentine stitch. Butt the edges of two blocks together and stitch. The serpentine stitch is a three step zigzag stitch used for stitching knit fabrics. The three separate stitches make it great for joining two fabric sandwiches.

Sept 14: Assemble the blocks in strips of 3 taking care to keep the pattern alternating.

Step 15: Then, join the strips of three together.

Step 16: After all the blocks are reassembled into your table runner press with a hot iron. Next cover each butted seam with a satin stitch. If Possible, use an embroidery foot that has extra space on the bottom of the foot for the thick satin stitches.
Tips for Satin Stitching:
• If possible use a medium to heavy wt thread (medium wt.= 40-30wt. heavy wt=25-12wt). A fine thread such as a 50 wt. will not fill in as nicely and you may have to re-stitch some of the lines.
• At the beginning of each stitch line hold the thread tails to prevent the top thread from getting stitched underneath and to help prevent thread build up at the edges of the satin stitch.
• A solid thread generally looks best for this technique because variegated colored threads often look like stripes when stitched in a satin stitch. Stripes can be fun depending on the look you want but they can be distracting to the overall pattern. The one exception I have found is the Star Variegated threads that are designed by Terry White. The color change in these threads is generally very subtle and you can see an example in the last photo of this tutorial below.
Step 17: Press well with a hot iron and finish the edges as desired. I used a traditional binding on mine. There are a lot of binding tutorials on the Internet if you need further details. Heather Bailey has a great one. A satin stitched edge would also look nice. If you choose to finish with a satin stitch edge use a stabilizer to keep the edge from stretching and rippling. Cut strips of tear away or water soluble stabilizer 2” wide and center the runner edge over the stabilizer. Stitch the edge then remove the stabilizer.

This runner looks great in a wide variety of fabrics from elegant silks to earthy batiks. I hope you have as much fun making them as I do!
 Liz Kettle is a textile and mixed-media artist who loves sewing and creating with fabric and thread. Sharing sewing joy and thread addiction with others makes her deliriously happy. Liz is co-author of two best selling books: Fabric Embellishing: The Basics and Beyond and Threads: The Basics and Beyond. Share Liz’s stitch journey on her website and blog at www.TextileEvolution.com

4 Responses to Fiber Art with Liz Kettle