
By Jamie Fingal
Learn to make a whimsical wall hanging to celebrate the birth of a new baby girl and/or baby boy.
The girl has a dress and the boy has overalls, and they hang on a baby hanger. They are each unique and fun, and personalized. You can add your own touches, like lace, unusual buttons, funky baby hangers. This is a perfect craft to make in an afternoon, and you’ve got something really unique that you can give as a gift or keep for yourself.
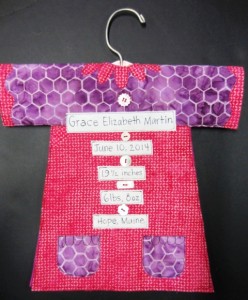
The girl wall hanging, sweet and simple!
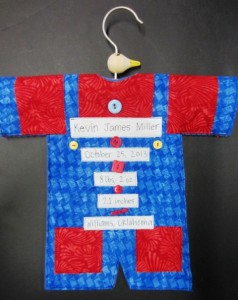
The boy wall hanging. Cute as a button.

The pattern is not to scale, but you can get an idea of the dimensions for each. The upper portion folds over, like the top of a shirt. It enables the hanger to work correctly, and finishes the piece nicely. You can make a pattern on a piece of larger paper, and draw the dimensions. Then cut out whichever pattern you want to make. Just wait to cut out the neck opening.
Materials Needed
- 2 pieces of black wool blended felt, National Nonwovens #TOY002 12” wide x 15” long
- 12” wide piece of fabric for each; one blue, one pink
- Scraps of pre-fused fabrics, 2 contrasting fabrics
- White fabric for the text
- Baby hangers, which are about 10” across
- Girl – 5 mother of pearl buttons
- Boy – 5 contrasting color buttons, and 2 for the straps
- Ruler and rotary cutter

Dimensions for the boy overalls, so you can make your own pattern.

Fold over the sleeves, matching them up on the lower edge. Place a pin at the center fold on the top.

Cut out the neck hole, which is 2-1/2” long across, and 1” in depth. I marked the 2-1/2” mark with pins to be my guide.

1” strips of blue for the shirt cuff. Line up and iron into place.

Add the overalls part to the lower portion, and iron into place.

Flip it over and cut from the back, using the felt as your guide.

Add the red on the sleeve portion, and cut the pockets which are 2” squares. Add ¾” strips for the overall straps. They hang over onto the blue, which is hard to see. Iron everything into place. From the back, so you can see the neck opening, cut the fabric away, to open it up.

White fabric for the text. The largest one is for the name of the baby and it is 1” high, all others are ¾” high. You can make them any length you want. I didn’t use plain while fabric, but chose a fabric with a slight print on it in faded gray. These are fused, and are ironed to a Mistyfuse Goddess Sheet, so I can write my text easier. You can iron them to a piece of parchment paper if you so desire.

I hand wrote the information on the white strips with a Pentel Gel Roller for Fabric. If you don’t trust your handwriting, you could print out the text from your computer, and then trace it onto the white fabric. I would suggest cutting more white strips than you need, in case you flub up. I did, of course. Trim the sides, so that the text is centered.

Place strips on the overalls, making sure it stays centered and then iron into place. It’s looking good! Get out your coordinating color for the back. This will add stability to the piece. Lay it into place and pin, so you can take it to the sewing machine.

Sew with a straight stitch over the entire piece, with the sleeves open. You can use a free motion foot too. You just want to get everything sewn down. The text and the pockets and all around the edges. And don’t forget the neck opening. Press it one more time,
so it is flat.

Hand sew the buttons on. I used a variety of funky buttons, and I used red Perle Cotton #8 thread.

Hand sew the sleeves on the lower portion, but not in the center portion of the back, leave open. You can see in the lower left hand corner, that this portion is hand sewn.

Insert your hanger from the back, and now you have a ‘cute as a button’ baby quilt to hang on the wall. Be sure to add a label inside, that you made it and date it. Fabulous!

The girl baby quilt is made the same as the boy, just different measurements, because you are making a dress. This will help you make a pattern 12” wide by 15” high.

Cut the neck first, scroll up to the boy quilt, and see the steps.

Place your fabrics on the black felt, and then press into place.
Cut from the back.

Add the fabrics. One for the sleeve portion and one for the skirt. Using the skirt fabric cut flower petals for the neck line. Use sharp scissors and fussy cut them. They don’t have to be perfect, just generally around the same size. Place them on the neckline, and press into place.

Cut two strips about 1” wide, and then cut wavy lines, so it ends up being about ¾” wide.
Press into place.

I cut two pockets that are 2” squares. Then cut one where I rounded the corners on the lower edge. Take that pocket and lay it over the other square to use as your guide for cutting.
Take out your coordinating felt for the backing. You can either leave it 12×15 inches and sew the quilt, or cut it the same size as your pattern. The second layer will add stability to your piece, especially during the sewing part. Cut out the neck portion before you
start sewing.

Scroll up to see how text is done, then place it on the dress and press
into place.

Sew with a straight stitch around the entire dress, text, neckline petals and pockets. I added some petals on the pockets with stitching. Be sure to sew around the neckline. Then press to get the entire dress flat. Fold over the sleeves and hand sew just the lower sleeve portion, same as the boys.

I sewed the buttons with pink Perle Cotton #8 thread. Inserted the baby hanger from the back. Modern Baby Girl – finished 12” across, and 11-1/2” from shoulder to hem. Happy quilting!
Click here for a printable PDF of Modern Baby
by Jamie Fingal
 Jamie Fingal is an artist, author, teacher, fabric designer, and curator who hails from Orange, California. An award winning artist and the author of the book Embellished Mini Quilts. Her whimsical and abstract work has been juried into International quilt exhibitions, featured in many books and various magazines and has two instructional DVD’s – The Whimsical House Quilt and Rebel Quilting. She has been a guest on Quilting Arts TV numerous times. As well as being the other half of the curating team of Dinner at Eight Artists, with Leslie Tucker Jenison. You’ll find her work in private, public, churches, and corporate collections, www.jamiefingaldesigns.com.

2 Responses to Modern Baby Wall Hanging